

Stitching up joy in every project!
Showing posts with label quilting. Show all posts
Showing posts with label quilting. Show all posts
Tuesday, January 15, 2013
First Spool of 2013
My first empty spool of 2013! So glad I got another while I was out yesterday, I still have about 1/4 of my quilt left to stitch! Coats & Clark trilobal poly in soft pink. Quilts great!


Wednesday, December 29, 2010
The Last Quilt of 2010?

I can't absolutely promise, but I think it quite likely that this will be the last quilt I finish in 2010. Next year I plan to be better about keeping track of how many quilts I actually finish in a year - I know there where quite a few this year, but I'm not sure if I can actually number them all. Maybe over the next couple of days I will see if I can backtrack and figure it out!
For the next couple of days I am going to spend some time cleaning up and organizing in my sewing room. I want to make a list of UFOs to finish, as well as a plan for working on some of the other projects that aren't even started yet, but I have purchased supplies for. I hope to be able to finish quite a few of these this year and clean out some breathing room in my space - I'm pretty tired of all the clutter and mess that I seem to deal with on a daily basis.

Back to the quilt - I think I am going to call it Dragonfly Dance. It is about 42 inches square and is made from the leftover pieces from another quilt. I actually had some good sized pieces of yardage, plenty to make this quilt top and have a bit of the bright green-blue left for my stash! I put the top together back in October, but hadn't found the right backing for it. I had in mind using some green or blue fabric, but wasn't having any luck finding what I had in mind. Tonight I felt like doing some simple quilting, so decided to look through my stash again and see what I might find, since organizing and clearing out the closet. I immediately spotted a tone on tone black print which was perfect. And there was plenty of it! So, a quick press, baste and I was in business quilting away. I even had a lovely green variegated thread that looks super on the top! Instant gratification, and one more off my list - definitely a pleasant evening!
Hopefully I can get a lot of cleaning done tomorrow, then I can do some more quilting - but at least I'm happy getting this one done!
In stitches,
Pamela
Saturday, December 04, 2010
Snails Trail Twin #1
Since Thanksgiving I have been hard at work on a couple of custom quilt orders. One is for two full size quilts done in the Snail's Trail pattern. One quilt will be orange and blue with green highlights. (It is finished and mailed out!) The second is orange and green with blue highlights. I have it cut out and ready to start sewing. They are such bright and happy quilts, it has been nice working on them during the gray and rainy days we've had lately.

I'm taking a quick break before stitching on the second quilt to work on the other project. The second involves me taking a small quilt I made and translating my idea into a larger format, and changing it to a landscape version! It is fun, challenging, a little frightening (fusing large swatches of fabric is definitely not what I am used to doing), and altogether enjoyable! When I finish the large one I will post pictures of them both and let you all tell me what you think of it. And tell the whole story behind the piece as well.
.
As you can see - my resident quilt inspector agrees - this was within 5 minutes of me finishing quilting it!
I'm taking a quick break before stitching on the second quilt to work on the other project. The second involves me taking a small quilt I made and translating my idea into a larger format, and changing it to a landscape version! It is fun, challenging, a little frightening (fusing large swatches of fabric is definitely not what I am used to doing), and altogether enjoyable! When I finish the large one I will post pictures of them both and let you all tell me what you think of it. And tell the whole story behind the piece as well.
.
Saturday, October 23, 2010
First Meeting finally finished!
 This was on my list of UFOs to work on this week. It's been in the bottom of my current project pile for months. I thought I was finished with it last year, but my husband (the man who is represented in the picture and the future owner of the quilt) requested that I add some words to the plain brown unquilted borders. Since this was a little out of my comfort zone I have been doing some major procrastination about it, and since he hasn't asked where the quilt was....it just wasn't getting finished. But it was causing me a great deal of guilt every time I would look at my pile. So today was the day I decided to tackle it!
I could not believe how much I actually enjoyed the process of figuring out how to add the words and achieving the effect I wanted. At first I thought I would make a rectangle like an engraved label and cut the letters out, letting the brown show through. After booting up EQ7 and playing for a bit I decided to applique the letters directly to the border using some kind of gold colored fabric. I then went into the sewing room looking for the right fabric. I dug through my stash for a few minutes, then my eye landed on a rolled fat quarter of gold satin that was given to me by a friend. Perfect! Well, maybe. First I had to test out a couple of letters to see if it was practical to fuse and applique satin letters. To my suprise, it worked out pretty well. I wouldn't do it on something that would get a lot of wear, but this is a wall-hanging, so the tendency to fray won't matter much.
I spent a pleasant hour or so tracing and fusing, cutting, then fusing again and was thrilled at the results. I then loaded up my machine with some silk thread and stitched around the letters. I then drew an outline around my letters to look like an engraved plaque. That's the point where I took the picture. After this I added some stitching that looks like wood grain on the rest of the brown border. I did some more stitching on the body of the quilt, fixing my husbands hair so it's not so white, and adding some white to the horse's rear foot. Now I just have to sew the hanging sleeve on and it is finished! I'm so happy to get this done - no more guilt, and my husband will have his quilt to hang in his office.
Maybe next time I won't procrastinate so much about doing something I'm not confident with. After all, doing something badly is better than never doing anything at all!
Happy Sewing!
Wednesday, September 01, 2010
I love September
Every since I can remember, I have loved September. Even though it did mean going back to school as a child, I still loved it. I loved the way the sun shines at a different angle, the cool nights and warm days, just the feeling of the air is different. The sky seems somehow more blue, and there is a peacefulness that seems to settle over me, knowing that another fall is about to begin.
I loved the new clothes for school, not to mention notebooks, pencils, erasers, and best of all - a brand new box of color crayons! MMMM - the smell of them still makes me smile! Seeing all your old friends, and making some new ones. Just the sense of a new beginning that the school year brought was always something I enjoyed.
As a mom, I enjoyed the start of a new school year because every year it meant a little more time for me, and for quilting! Now I only have one child in school, and it means that I'm usually a little more busy than in summer, but it's also the start of my quilt guild year, which is fun. This year I am looking forward to Quilt Guild because now I am a DPP (Distinguished Past President)! Which means I get to sit with my friends and enjoy the meeting, not stand up in front and run the meeting - WOOHOO!
We also have our annual Quilt Show in September, which I am looking forward to. I am on the publicity committee, so I am busy putting out posters and sending out Press Releases. I have one more quilt to finish, so will have to get busy on that this week, maybe I will actually baste it tomorrow. Anyway, I'm getting back into the groove a little at a time. Maybe that's something I learned from my vacation in Paris. To take time with a cup of coffee and savor the moment - to enjoy the day and savor every day for what it is.
Bon Soir!
I loved the new clothes for school, not to mention notebooks, pencils, erasers, and best of all - a brand new box of color crayons! MMMM - the smell of them still makes me smile! Seeing all your old friends, and making some new ones. Just the sense of a new beginning that the school year brought was always something I enjoyed.
As a mom, I enjoyed the start of a new school year because every year it meant a little more time for me, and for quilting! Now I only have one child in school, and it means that I'm usually a little more busy than in summer, but it's also the start of my quilt guild year, which is fun. This year I am looking forward to Quilt Guild because now I am a DPP (Distinguished Past President)! Which means I get to sit with my friends and enjoy the meeting, not stand up in front and run the meeting - WOOHOO!
We also have our annual Quilt Show in September, which I am looking forward to. I am on the publicity committee, so I am busy putting out posters and sending out Press Releases. I have one more quilt to finish, so will have to get busy on that this week, maybe I will actually baste it tomorrow. Anyway, I'm getting back into the groove a little at a time. Maybe that's something I learned from my vacation in Paris. To take time with a cup of coffee and savor the moment - to enjoy the day and savor every day for what it is.
Bon Soir!
Monday, July 26, 2010
Pink Heart Cross Stitch Quilt
Not a very clever title, but sometimes I just don't have words. Not that my husband would agree with that statement, but that's my story and I am sticking to it. At least for today!


I finished this custom quilt order last week, and my customer picked it up today. She was absolutely thrilled with the results and can't wait to show it to her mom, who did the cross stitching. Mom thought this was a table runner, but after looking at it we decided that it is actually the center panel of a quilt. The other two panels would probably have been borders to bring the quilt up to size.
I made two queen size pillow shams to match the quilt by cutting off the top and bottom sections of the long panel. I added Kona Snow to the top and bottom of the borders to make them big enough, bordered the whole thing with 2 1/2 inch pink strips for the flange, then free-motion quilted around the cross-stitching. I added quilted hearts to the plain sections. They are backed with panels of Snow that overlap for the closure.
For the quilt itself I took the large center panel of cross stitching and added a border of pink. The original plan was to simply make the quilt larger by adding a border of Kona Snow, but that was too much white. I designed a border with squares on point to go around it and am very happy with the results - it adds to the quilt without taking the focus away from the lovely center cross-stitch panel. I quilted the outer border with simple diagonal lines. We were trying to stay within a budget, so I didn't do a lot of quilting, but it looks nice. The pink border was quilted with a meander and hearts (using pink thread).
 I quilted around the motifs in the cross stitch and it really looked nice. I suspect that the lines of french knots may have been intended to be the quilting lines, but we don't know for sure. It took me a while to figure out that the green shape in the hearts is a fleur de lis. It was actually fun to quilt the cross stitch section, except for the french knots. There were several feathered sections stitched in them and it was really hard to stitch by them without stitching through them!
I quilted the outer border with simple diagonal lines. We were trying to stay within a budget, so I didn't do a lot of quilting, but it looks nice. The pink border was quilted with a meander and hearts (using pink thread).I quilted around the motifs in the cross stitch and it really looked nice. I suspect that the lines of french knots may have been intended to be the quilting lines, but we don't know for sure. It took me a while to figure out that the green shape in the hearts is a fleur de lis. It was actually fun to quilt the cross stitch section, except for the french knots. There were several feathered sections stitched in them and it was really hard to stitch by them without stitching through them!The mom found this panel (unstitched) at a garage sale and spent all winter doing the stitching. It's really a beautiful piece and I am glad that they allowed me to transform it into a finished quilt. I know it will be very much cherished and loved!
Enjoy!
Tuesday, June 22, 2010
A New Project - Day 2
I had a very productive day today - got several small jobs finished, worked on a large one and made some good headway, then worked on my new project for a while this afternoon. I wanted to make 6 1/2 inch fan blocks for the corners. I printed up some paper piecing templates using my Electric Quilt program and cut some strips for the fan blades. I laid the strips out and decided on the arrangement I wanted, and brought my fabric and paper piecing templates to the sewing machine.

I haven't done any paper piecing for a while, so was off to a slow start, but after getting into the upside down and backwards mode I made short work of sewing the fans. I realized that I made two going one way, and two the other, but decided that would work for my design. At least I didn't have one odd ball, with two you can just say that you meant to do it that way! I trimmed them up, then was ready for the next step.
I wanted to add piping to the curved edges of the fan, so tried out my handy piping foot for this - it worked brilliantly!  Now the best thing about this technique - you press the seam allowance on the piping under and are ready to machine applique your fan to your background. To do this you stitch in the ditch of the seam between the piping and the fan. I tried the piping foot for this, but wasn't thrilled with the results. I also tried my regular straight stitch foot, and though it was better, still not very easy. I finally tried my adjustable zipper foot and it was the best for this step. It's pretty tricky to stitch right in that ditch so the visibility of the zipper foot made all the difference.
Now the best thing about this technique - you press the seam allowance on the piping under and are ready to machine applique your fan to your background. To do this you stitch in the ditch of the seam between the piping and the fan. I tried the piping foot for this, but wasn't thrilled with the results. I also tried my regular straight stitch foot, and though it was better, still not very easy. I finally tried my adjustable zipper foot and it was the best for this step. It's pretty tricky to stitch right in that ditch so the visibility of the zipper foot made all the difference. 
I think they came out really pretty! My quilt is coming together well and I think it will be wonderful when it is finished!
I also did some quilting this evening. I've got 4 quilts basted and really need to get them going, but seem to be stuck on ideas for how to quilt them. So I started one, just doing some basic outlining, then stitching some curves in the checkerboard border. I then tackled the largest one, more outlining - it's a has a cross stitched center and so far is looking good! Still not sure what I'm going to do in all the borders, which are not cross stitch, but I figure by the time I get there I will have an idea (hopefully!) It felt good to make such good progress on my pile of things to do, I hope I can keep up the good work.
Monday, June 21, 2010
A New Project
I was hard at work tonight, creating something new! Fun!
 First things first. You start off with a 1 1/4 inch strip of bias (for my project I cut 6 of these out a half-yard of fabric). Sew them together end to end with a diagonal seam. You then sew the narrow poly cord into the fold of the fabric to create the cording. You can use your zipper foot for this, but I purchased a cording foot and it makes it even easier to sew because it has a groove for the cord and a perfect 1/4 seam allowance! As you can tell, I am all about the tools - I firmly believe that if there is a tool to make a technique easier it's well worth investing in it! Especially if it involves getting a perfect seam allowance!

Of course, it helps to have a good assistant to help with those trimmed edges!

After making my piping, I added it to the edges of an Emporer's Collection panel. I am still playing with the borders, but it's looking good so far! I want to do something a little different in the corners, but as it is late, it's time to wrap it up for the night. Hopefully I'll have time tomorrow to finish the borders!
For my project I made some narrow piping for an accent. Out of pretty sky blue Fairy Frost (I don't think it's really sky blue, but I forgot what the actual name of the color was - I'll try to remember to check when I go in to the shop to teach tomorrow night).
Making this piping is really easy - there are several great piping books available by Susan K Cleveland. The one I learned with was Piping Hot Curves. I actually bought the book and ruler set, and love the ruler - it has a groove in it so you can trim your finished piping to have a perfect 1/4 inch seam allowance.
First things first. You start off with a 1 1/4 inch strip of bias (for my project I cut 6 of these out a half-yard of fabric). Sew them together end to end with a diagonal seam. You then sew the narrow poly cord into the fold of the fabric to create the cording. You can use your zipper foot for this, but I purchased a cording foot and it makes it even easier to sew because it has a groove for the cord and a perfect 1/4 seam allowance! As you can tell, I am all about the tools - I firmly believe that if there is a tool to make a technique easier it's well worth investing in it! Especially if it involves getting a perfect seam allowance! After you sew your long strip, you trim it up so it has that 1/4 seam allowance, then it's ready to sew to your quilt.
Of course, it helps to have a good assistant to help with those trimmed edges!
After making my piping, I added it to the edges of an Emporer's Collection panel. I am still playing with the borders, but it's looking good so far! I want to do something a little different in the corners, but as it is late, it's time to wrap it up for the night. Hopefully I'll have time tomorrow to finish the borders!
Friday, June 18, 2010
Free Day
Today was a nice day, it was a free day - just a day where I pretty much just puttered around and did what I felt like doing at the moment. It was really nice! I've been working hard to get things finished and was starting to feel like I was on some kind of a hamster wheel, which is not fun (at least for a non-hamster!). I still have a lot of projects to work on and goals to meet, but I feel a bit more relaxed and rested now.
I have a lot of quilting to do, more pattern writing, and of course the random alteration gig that helps keep us in groceries! And I am only two months from taking a very special trip - I finally turned in my Passport application this week - so that's one thing off my list!
I finished my pattern for this quilt and have it printed and ready for sale in my Etsy shop -

I will be teaching this quilt as a class this fall. It's super easy, and so pretty, plus you can make it with only 3 different fabrics. I see possibilities every time I go into a fabric shop - saw some lovely autumn fabrics this week to use with it.
Next on the list is the pattern for the sample I made using a Kona Bay Emporer's Collection panel. Not to mention some Christmas projects for the quilt shop. As usual I am a busy quilter! Ah, but it's better than being bored and hanging out in bars - that's a pretty common joke at the quilt shop for husbands that complain about visiting us! Most of them are pretty good about it, they know it's good to keep their ladies happy.
I am looking forward to my copy of EQ7 arriving next week - can't wait to see what improvements have been added - though I've barely learned 6 at this point. Am considering working on a block of the month, we'll have to see about that and if I can keep up with the commitment, or be perhaps be committed! Like I said earlier, too many ideas and projects in my head to ever do them all.
Had fun playing Bunco tonight, even won a prize of a set of lovely handmade cards - that's one hobby I don't think I'll ever take up, but I do love the nice things that can be made.
Time for sleep, and hopefully another good day tomorrow, think I'll actually do some quilting!
Thursday, April 01, 2010
Frugal Quilting - Binding from Scraps
 Have you ever noticed that binding is one of those things that just never comes out even? For every project I complete I almost always have a length of binding left over. Sometimes it's only a few inches, but often it can be much more. For the past year I have been collecting my leftover binding pieces in a shoe box along with other small scraps. My box has recently started to overflow with bits and pieces so I decided it was time to sew the binding scraps together to make a lenght of binding ready for scrap quilts.
I sewed the strips together using a diagonal seam to join the strips and ended up with a very long piece of binding. After pressing all the seams open and making sure my fabric was nice and smooth with a good fold in the center I rolled it all up around a small notebook. This will allow me to place the roll around my wrist as I sew the binding on, keeping it clean and untangled! I think this roll will bind at least two queen size quilts. Pretty good for just using pieces leftover from other projects!
For this set of strips I sewed them together in an "anything goes" kind of a way, but I think I might try saving my bits in a different way next round. I could do a bag of pastels, a bag of earth tones and a bag of brights. That way I would have some more coordinated binding sets. It also might be a nice idea to sew them together as I gather them. Though it did only take me an hour to sew all my bits together and press them. Either way, it's lovely to have some pre-made binding at my disposal for various projects.
Scrappy binding is a great way to save money - to bind a queen size quilt I would buy at least 3/4 of a yard of fabric, so this lenth of binding saved me about $15.00 at current quilt shop prices, and it will look great around the string quilt blocks I am working on. Let me know if you try this - and I'd love to see pictures of quilts with scrappy bindings!
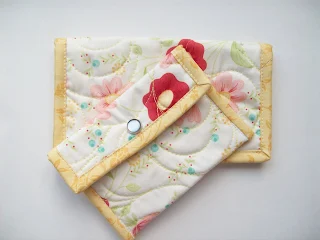
And - my new listing for the day - Pastel Floral Checkbook Cover and Wallet
April Fools Club on Etsy!
I'm joining in with a group of people on Etsy who have made it a goal to add one new listing a day to their shop. Great goal, and a talented group of people - if you want to see the items check out this thread on the forums there. I sure hope this increases sales because I already see some stuff I want!
This is my listing for the day:
This is my listing for the day:
 I made it using the last fat quarter of this fabric left in the quilt shop. So pretty, and very feminine. Soon I will be listing a checkbook cover and wallet that match, I need to go take some pictures while the sun is out - yes we have sun today!
Wednesday, March 03, 2010
A Juggling Act
I suppose many of us feel this way, but right now I feel like my life is a juggling act and I am coming perilously close to dropping some of my balls. Or maybe they are chainsaws and that is why I feel so anxious! I am finding it harder every day to balance taking care of my family, the house, working at the quilt shop, doing alterations, overseeing the local quilt guild and an online quilt group, and trying to fit in time to exercise and take care of myself. Notice that leaves me a big fat 0 for quilting or blogging about quilting. In fact sometimes I feel so paralyzed by all the things that I need to do that I find myself zoning out and doing nothing at all. Which doesn't help.
I suppose I need to sit down and make a priority list. But that's too depressing, and who wants to look at a long list of things they really should be doing and know can't get done in a day. This week I have put myself at the top of my unwritten list. I am going to go for a walk everyday. I am going to shave my legs and trim my nails. I am going to make an appointment to get my hair trimmed. And I am going to do some quilting. Some just for the fun of it, because I want to quilting. Even if it is only for an hour a day I need to work on a project that I an enthusiastic about and enjoy. Then I think I will have the energy to tackle the rest.
I remember when I first started on my quilting journey. I was a young mom with 3 little girls under 5 years of age and a fourth on the way. I always enjoyed sewing, but when I discovered the world of quilting it was love at first stitch. The reason I loved it? It was the one thing that I could do every day that would stay done! If I spent an hour stitching patches together, they were still sewn the next day - the patches I cut (with a template and scissors!) were still cut. And the colors and fabrics were so much fun to play with, it challenged my brain and my artistic abilities.
Quilting has always been soothing for me, the concentration involved takes you away from your worries, and the results are so pleasing. So onwards I go, tackling each day as it comes, and each project. Even though life is stressful now, it will pass, and my lovely quilts will help me remember these days with a smile just like my early quilts do.
I suppose I need to sit down and make a priority list. But that's too depressing, and who wants to look at a long list of things they really should be doing and know can't get done in a day. This week I have put myself at the top of my unwritten list. I am going to go for a walk everyday. I am going to shave my legs and trim my nails. I am going to make an appointment to get my hair trimmed. And I am going to do some quilting. Some just for the fun of it, because I want to quilting. Even if it is only for an hour a day I need to work on a project that I an enthusiastic about and enjoy. Then I think I will have the energy to tackle the rest.
I remember when I first started on my quilting journey. I was a young mom with 3 little girls under 5 years of age and a fourth on the way. I always enjoyed sewing, but when I discovered the world of quilting it was love at first stitch. The reason I loved it? It was the one thing that I could do every day that would stay done! If I spent an hour stitching patches together, they were still sewn the next day - the patches I cut (with a template and scissors!) were still cut. And the colors and fabrics were so much fun to play with, it challenged my brain and my artistic abilities.
Quilting has always been soothing for me, the concentration involved takes you away from your worries, and the results are so pleasing. So onwards I go, tackling each day as it comes, and each project. Even though life is stressful now, it will pass, and my lovely quilts will help me remember these days with a smile just like my early quilts do.
Tuesday, October 27, 2009
Time for Tea, Take Two
Is there such a thing as too much alliteration? Probably, but it makes me smile! Today was a work day, I had a dress for homecoming come in that needed to be done at the last minute. A dress that was very encrusted with beading and needed to be taken in. So that means removing beads and securing threads so the rest of them don't go flying with every movement, plus the actual sewing. So that took up a nice chunk of my day.

Then I worked on finishing this little quilt. It is made from leftover scraps after cutting triangles from strips. The pieces were too big and pretty to throw away, and this is the second quilt I have made from them. I thought it might be fun to put some pictures of the quilt in progress in the listing. So I am going to share them here first! I think my heart skills are improving. A lot of these actually looked like real hearts, not my usual heart or leaf? shapes. I suppose there is hope for my limited drawing skills after all!

Stitching the binding on - and you can see another good looking heart! I am so in love with the method of sewing the binding on totally by machine - it is so fast, and I have it down to a science. It makes binding go so much faster than stitching by hand, and I think it looks great. I also put a couple of borders on a panel for a baby quilt. So I just need to figure out what to use for a back and I have another one to get quilted. I'm glad I'm getting some of these projects finished up, it will really help unclutter my sewing room, and it's nice to add some new items to my Etsy shop!

I did have time this evening to do a little spot of quilting as well as filling a custom request. I finished this set of quilted shoe bags - made for a dancer who wants to protect her shoes when she travels! They came out very cute, and my photography skills have vastly improved since I listed my original bag two years ago. I think I need to retake some of those!

Then I worked on finishing this little quilt. It is made from leftover scraps after cutting triangles from strips. The pieces were too big and pretty to throw away, and this is the second quilt I have made from them. I thought it might be fun to put some pictures of the quilt in progress in the listing. So I am going to share them here first! I think my heart skills are improving. A lot of these actually looked like real hearts, not my usual heart or leaf? shapes. I suppose there is hope for my limited drawing skills after all!

Stitching the binding on - and you can see another good looking heart! I am so in love with the method of sewing the binding on totally by machine - it is so fast, and I have it down to a science. It makes binding go so much faster than stitching by hand, and I think it looks great. I also put a couple of borders on a panel for a baby quilt. So I just need to figure out what to use for a back and I have another one to get quilted. I'm glad I'm getting some of these projects finished up, it will really help unclutter my sewing room, and it's nice to add some new items to my Etsy shop!
Sunday, October 25, 2009
Keeping up the pace...
I spent the afternoon working on more projects today. I finished binding the two quilts I quilted yesterday and took pictures of them, even though it was a cloudy day. It feels really good to have two finished projects!

I also added the final border to the ribbon star table runner I have been working on, and finished writing the pattern for that. Now I just have to make some non-holiday samples of it and I will be ready to get that printed up.
I got two quilts basted, my second version of "Candy Heart" that was not quite what I wanted, and the scrap quilt I made from the leftovers of this. I used a little piece of Strawberry Shortcake fabric that I have had in my stash for many years for the back of the little one - it will be adorable when it's finished!
So I am pretty happy with me efforts this weekend. I feel like I have been a bit "blocked" with my quilting, but it felt really good to go from project to project this weekend and just move some of them along toward the finish line. Hopefully as I have some spare time this week I will continue to chip away at these projects and even have time to start some of the new ones that are flitting around the edges of my thoughts.
The first one made me think of the song "Stray Cat Strut" but I didn't think that made such a great title for a baby quilt, so just called it Cats on the Fence. The second one is a panel with pieced borders that has the words "Ever After" so that will be it's name. I think this would make a cute baby quit, or even a housewarming gift. Kind of folk art looking, I think.

I also added the final border to the ribbon star table runner I have been working on, and finished writing the pattern for that. Now I just have to make some non-holiday samples of it and I will be ready to get that printed up.
I got two quilts basted, my second version of "Candy Heart" that was not quite what I wanted, and the scrap quilt I made from the leftovers of this. I used a little piece of Strawberry Shortcake fabric that I have had in my stash for many years for the back of the little one - it will be adorable when it's finished!
So I am pretty happy with me efforts this weekend. I feel like I have been a bit "blocked" with my quilting, but it felt really good to go from project to project this weekend and just move some of them along toward the finish line. Hopefully as I have some spare time this week I will continue to chip away at these projects and even have time to start some of the new ones that are flitting around the edges of my thoughts.
Saturday, October 24, 2009
Definite Progress!
The sun did come out and it was a beautiful day today, but I kept on track and actually got a lot done! To tell the truth, I started making a list last night of all the projects I am working on and got a little overwhelmed. So I just told myself that a little progress is better than just going and hiding my head under the covers because I have so many things I want to get done. So today, I just did a little here and a little there and before you know it I had accomplished quite a bit.
 I finished quilting my Mount Kilimanjaro quilt (and learned how to spell it correctly as well!) I have been putting off quilting this for so long because I just could not figure out what in the world to quilt on it. I gave myself a good pep talk and told myself to just start and it would come to me what to quilt. And it did! The sky was pretty easy, then I just started to outline the animals and think. I thought of putting grass around the onpoint squares and once I started quilting, it just started flowing into a kind of grassy vine that looks really good! A little outlining on the bushes and water, and it all just sort of flowed together and looks really nicely done. I finished the binding, photographed it and actually got it listed in my Etsy shop tonight - I would be well pleased with just getting that done, but there is more!

I got the scrappy rail fence baby quilt quilted, plus another baby size quilt quilted also! Both are trimmed and the binding is cut, waiting for tomorrow to be finished up. Now, I can't forget, they all need labeled also, and I am going to add them to the quilt journal I got in my prize package from the quilt show so I can remember all the details about making them. It surprises me how much I forget about each quilt within a year. I also finished putting borders on my leftover scrappy quilt and chose a backing fabric for it and the larger quilt. So, I added two to the pile to be quilted, but got three quilted today! I must say, it was a good days work, plus I managed to do a couple loads of laundry, grocery shop and wash dishes after dinner. Wish I could be this productive every day!


I got the scrappy rail fence baby quilt quilted, plus another baby size quilt quilted also! Both are trimmed and the binding is cut, waiting for tomorrow to be finished up. Now, I can't forget, they all need labeled also, and I am going to add them to the quilt journal I got in my prize package from the quilt show so I can remember all the details about making them. It surprises me how much I forget about each quilt within a year. I also finished putting borders on my leftover scrappy quilt and chose a backing fabric for it and the larger quilt. So, I added two to the pile to be quilted, but got three quilted today! I must say, it was a good days work, plus I managed to do a couple loads of laundry, grocery shop and wash dishes after dinner. Wish I could be this productive every day!
Wednesday, February 25, 2009
Wednesday Project - Miniature Snowball and Nine-patch (part 2)
Today I promise you quick, fun and easy nine-patches, so lets get started!


Then sew the third strip on and press this seam towards the dark. These strips should measure 3 1/2" x about 32".

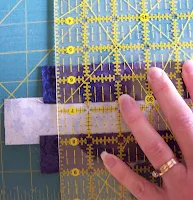
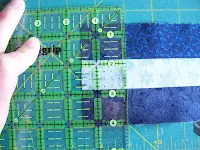


Using the strips from last weeks step, (they should measure about 1 1/2" x 32", divide them in to 4 sets of three strips.

You will sew two sets with the lightest strip in the center position and two sets with the darkest strip in the center. Sew the first two strips together at the long sides, and press to the dark.

Then sew the third strip on and press this seam towards the dark. These strips should measure 3 1/2" x about 32".

Place one strip on the cutting board and square up the end of the strip by cutting at a 90 degree angle from the bottom of the strip.

Then, cut across the width of the strip in 1 1/2" strips.

Make sure you are making 90 degree cuts so you have nice squares when you sew them together. You can also use this nifty June Taylor ruler.

It has slits, so you can make a series of cuts without having to worry about moving and squaring up your ruler with every cut. Repeat for all 4 sets of strips. You should have a total of around 80 strips.
Mix up all your strips, then start sewing them together in pairs. You will sew 25 sets of pairs first, press, then add one more set of strips to your squares to make your nine-patches. Make sure to mix up the strips as you sew them, and avoid sewing the same sets together to make it look nice and scrappy. You have a few extra strips, so this will make it easier to make sure the last few blocks work out without having to plan ahead too much.

Press once more. Your squares should measure 3 1/2" x 3 1/2". Aren't they cute, and so easy to make! No one will believe you did it with strips!
Next week we will sew our blocks together to make the top. I've got some good tips to help out, so you'll want to check in and see how I do it!
Wednesday, February 18, 2009
Wednesday Project - Miniature Snowball and 9-Patch Quilt
This is the debut of my Wednesday Project feature. Each Wednesday I am going to give you instructions for a basic quilting project. Some will be complete in one day, some will be a series. This first project will be a series - Miniature Snowball and Nine-Patch.


To make this project you will need:
12 strips: 1 1/2 inches by 45 inches of a variety of blue fabrics from light to dark.
1 Fat Quarter white or white on white fabric.
1/3 yard blue fabric for border.
For todays step you will cut 8 squares 1 1/2 inches from each blue strip for a total of 96 squares
Cut 24 squares 3 1/2 x 3 1/2 inches from the white fat quarter.
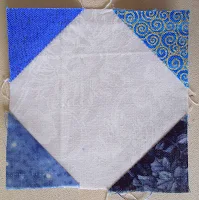
This technique is one of my favorite ways to add a triangle to the corner of a square, and is especially handy for working with miniatures.
Simply lay your white 3 1/2" square face up. On the top right corner place a blue 1 1/2" square, aligning the edges.


Stitch from the top left corner of the blue square to the bottom right corner of the blue square.
Trim your seam allowance 1/4 inch from your stitching line.
Press triangle toward the outside of the block.


I like to chain piece my snowballs - I simply overlap the squares and sew the corners in one long line.

You can stitch, trim and press each corner at once, but I prefer to do all my sewing, then all my trimming, and finish with pressing.


You should now have 24 snowball blocks. Check back next week and we will make all of our nine-patch blocks without cutting individual squares - the fast, easy and fun way!
Wednesday, December 31, 2008
Happy New Year (what else?)
One last post for the year 2008. It's been an interesting year, ups and downs, triumphs and frustrations, but I can't complain! Christmas was lovely, despite a nasty cold. I enjoyed having my girls home, and sharing my grandson's first Christmas. And as a bonus found out that next Christmas there'll be another grandbaby to enjoy! One of the best presents of all!


Quilted a lot this year, but nothing spectacular. Oh, but the ideas are running through my head for the next fabulous quilt! Nothing concrete yet, but the inspirations are coming together, and the designing is under way. Fabric and stitching be happening soon, I think!
I spent the last couple of days finishing up a UFO project. A set of blocks from a Swap I did with my fellow Quiltsy Members (Quilting street team on Etsy). The colors were blue and green and they were a lovely set of blocks, but I could not figure out how in the world to set them together. Nothing seemed to work in blue or green and it just muddied up the blocks and they didn't stand out. Then I was inspired to try an alternate color. I didn't have a good orange, but found the nicest yellow that was perfect to set them off! Now each block sparkles like the jewel it is!
One of the nice thing about working with these blocks is the fact that each of them was exactly the right size and square! How often does that happen in a swap? I tell you, the Quiltsy team is one talented set of quilters, and any quilt you would buy from them would would be well worth your money!
I even have the back ready. I pieced it (yeah, me!) using the one leftover block which was a duplicate of my own, and the leftover fabric that I purchased to make my blocks with. I even have plenty for binding! All I have to do is rustle up a square of batting to fit and I'm ready to quilt. That would be a good project for tomorrow. Well, Happy New Year to you all! Stay safe and have a wonderful evening, and I'll be back next year (I know, I'm just corny that way!)
Tuesday, November 25, 2008
Day by Day

I'm feeling better, and am getting back to normal! I've been busy and getting things done, including doing some cleaning out in my sewing room. I started to organize my UFO's (UnFinished Objects) and got to 9 before I gave up and started stashing them in drawers and bins! I do have a rather large basket of things I'd like to finish before year's end, so have my work cut out for me!
One bit of very good news is that I found all my small sewing scissors! I have been baffled by their disappearance, but had no clue as to where I had stashed them. I figured that they were in the bottom of my chair or something similar. I was looking for some red and green quilting thread to make yo-yos on Friday, and found them in my tin of quilting thread. I had done a demo at the quilt show in 2007 on hand quilting, and left them in the tin, and put the tin up on a decorative shelf a month later without looking inside. Was I ever happy to see them! Especially the one that goes around my neck - it's so handy to have to use when I'm hand quilting.
I suppose I don't have much else to add for now, but am excited to share my new projects as I finish them. Can I get 9 done before the end of the year? We shall see! Tomorrow I will post my list and I'll keep my progress updated.
Oh, I got a pattern written up for my journal covers and will have that listed in my Etsy shop soon! In the meantime, here are a couple that I did for my friend Patti:

Subscribe to:
Posts (Atom)