Showing posts with label Electric Quilt. Show all posts

Sunday, September 29, 2019

September Island Batik Ambassador Challenge - Cleo's Kaleidoscope

I'm glad I got an early start on this month's Island Batik Ambassador challenge because it took me until yesterday to actually get it quilted and finished!  I am excited to debut today's quilt - Cleo's Kaleidoscope!

Here is our inspiration for the theme of the challenge:  "Let your inner child come out to play!  Color, fun and playful are all for grabs this month! Make a quilt for a kid that you love or to donate to a kid that needs comfort. Clear out space for magic & whimsy when creating this month!"
We needed to use the new Block on Board die we received in our June Ambassador box, fabric from either of the boxes we received, and make a juvenile inspired quilt larger than 45 x 60. I received the Cleopatra's Fan die from AccuQuilt - so pretty, and this was going to make a good challenge to come up with a quilt that would be fit for a child! This block seemed more like an elegant type of design, so I was intrigued with the idea of making something fun and whimsical out of it.


I decided to use these fabrics that I received in the July box (box 2) They coordinate with the Mermaid's Cove strip pack and are all basics and blenders that are always available! Those and the solid black should make a fun and colorful quilt!


Thanks to EQ8 I was able to create virtual blocks to play with the colors and layout of my fabric before making even one cut! This is what the traditional coloring of the block looks like. Pretty. But I didn't have enough fabric to make the number of blocks I wanted to use in my quilt (12) and I wanted a more playful and whimsical look. So what if you mix the colors up to make some interesting shapes? Like in a Kaleidoscope!
Now we are getting more interesting and fun! It did make the cutting a bit more challenging, but I managed that by figuring out what pieces went where in the block and made a cutting chart for myself. It helped that the die is clearly marked with letters for each piece. I just measured my piece, layered a stack of the appropriate size fabric and cut. It took a few more passes because my layout was a bit complicated, but it really wasn't difficult at all!
You can't cover all the shapes at once because the overlapping fabric would be too many layers, so you do have to alternate pieces when cutting this way. Notice that the pieces are laid out in groups. This makes it possible to use strips for the traditional coloring method and it's easier to cut them out in groups with less fabric waste.
It did get a little tricky because some of my blocks were mirrored and I used two different color stories for my blocks, but by lettering my printouts from EQ8 and making a list of how many of each color I needed that task was accomplished.
Sewing my first block was amazing. I didn't use one pin on this block! The pieces have notches to match up, the instructions include seam pressing instructions and the curves are gentle and easy. Doesn't it look awesome?


My four center blocks were symmetrical, so they were perfect to practice on. First I laid all my pieces out.
Then started sewing! I've done curved seams before so wasn't too intimidated. I like to sew curves with the convex part on top. Start at the top of the curve, matching up the top edges.
Then I use my fingers to line up the edges of the seam, making sure to match the notch. (For a change my fingernails look pretty because of a pre-wedding manicure!) Sew that 1/4 inch seam to the notch, then line up the end of the seam and stitch that:
Ta-da! No pins!
Center blocks up on the design wall. Oh, the possibilities!
After piecing the remaining eight blocks I spent a lot of time arranging blocks! There were a lot of ideas in the running, but eventually I narrowed it down to my favorite - there was a lot of EQ8 involved in this step as well!


It was so hard to pick a favorite, but I finally did and got my top sewn together. I pin basted it, I was really hoping to use the remaining piece from the Hobbs Black batting, which I loved for my March project, but didn't have quite enough left for this project.

I decided to go with the Heirloom Premium 100% natural cotton because it's really a great all purpose batting and would work well for this quilt. I really love the light weight feel of this batting, and the lovely texture you get after washing. Since this quilt is for a child, it will definitely need to stand up to washings!

I was done with this step early in the month, but a busy September kept me from quilting it until this week!
I pulled out all my Aurifil thread and started matching up to all my fabrics. (I also used it for all the piecing - the 50 wt is the perfect thread for nice flat seams!) I found something for every color! I like using the 50 wt for quilting because it really blends in and lets the piecing take center stage. Plus, you don't need to perfectly match the colors to the fabric - this green wasn't quite the same color as the Cherio dots, but it looks great on the quilt!

I stitched a 1/4 inch line around each piece. Yes, that was a lot of thread to clip at the end. I did each color as I finished and it wasn't too bad of a task, plus it gave me a good reason to get up and move, which keeps me from getting knots in my neck! Here is how I keep from getting knots on the back of my quilt:
This is similar to how I pull up the threads if I am going to knot and bury them as well. I bring up the bobbin thread by holding the top thread taught with my thumb, then needle down and up.
You can see the small thread tail that has popped up. I then lift my presser foot and use my tweezers to grab that thread and pull it out.
I then hold both threads together with my thumb, lower the presser foot and take a couple of stitches in one spot to secure the thread. I can then quilt around my shape, coming back to the starting point. I take a couple of stitches again to anchor the threads, then I use the thread cutter on my machine to cut the thread. After quilting all the same color I take my thread to my cutting table and I trim all the top threads flush with the top of the quilt, then flip my quilt to the back and trim all the little 1/4 inch ends that are sticking out. By holding the threads at the beginning you eliminate those nasty little thread ends from tangling up at the beginning of your stitching. If I want to bury my thread ends in the quilt I don't cut my thread at the end of my stitching line, instead I raise the needle and move my quilt a few inches then use the thread cutter so I have longer tails to deal with. I mostly just trim my threads for quilts that will be used and not go out to shows. One of those personal preference things!


For the setting triangles on the sides I used straight lines radiating to the outside of the quilt, and that looks really nice with the piecing, too!


So, there is another lovely finish in the books for September!  I hope you enjoyed seeing how I made my quilt, and maybe you picked up a good pointer or two.  Have you ever done curved piecing?  Are you a pinner or are you crazy like me and like to just sew them with no pins?  I'd love to hear if you have any great tips for sewing curves - it seems like lots of people are a little scared of them, and it would be great to share ideas to help make it a little easier to accomplish them.  I have to say, having the Go! fabric cutter made the cutting a lot easier because that's the part I don't like about curves!  I really love the cutter, and am so thankful to AccuQuilt for providing me with one this year as part of the Island Batik Ambassador program!

As always, a big thank you to Island Batik, Aurifil thread and Hobbs Batting for providing products and inspiration for this project!  I love being an Island Batik Ambassador!

May you be inspired to create something fun as well, today!  Thanks for reading!

Sunday, July 10, 2016

Designing a Medallion Style quilt in EQ7

I can't believe it is the 10th of July already, this summer is just zooming past.  This month Island Batik is partnering in the 25th anniversary of Electric Quilt - they will be giving out a copy of the EQ7 software, so make sure you enter for a chance to win that, as well as entering on the Electric Quilt website for a bundle of Island Batik fabric!

I thought I would share some tips for designing a medallion style quilt this month (my Christmas In July challenge for Island Batik is a medallion quilt).  EQ7 has a variety of border styles that make this a fun and creative process.

First you need to start out with your quilt layout.  I just wanted one 12 inch block as my center, so after adding a few choices into my sketchbook I started a new quilt, using a horizontal layout.  I then clicked the first tab (layout) and after selecting 1 block horizontal and vertical set my block size at 12 inches.

 Next step is to go to the second tab (borders) and start selecting your borders.  Your layout will probably start with one border already present.  


As you can see, there are quite a few border styles to choose from.  It's a lot of fun to click on each one to see what happens.  There are additional options for the different border styles as well, you can usually adjust the number of units in the border, and the width of your border.

To see how the block will look with your center block you click the Layer 1 tab.  Color the border just as you would a block.  If you use the control key you can color all the units on each side at once - that makes it quick and easy.
I used this as my second border because I liked the way it reflected the triangles in the block.  Now you can go back to the border tab and add another border by just clicking add.  I wanted to make this border a plain border with corner blocks and knew that I would have to cut the strips at 3 inches, so selected a 2.5 inch border with cornerstones - simple and easy!
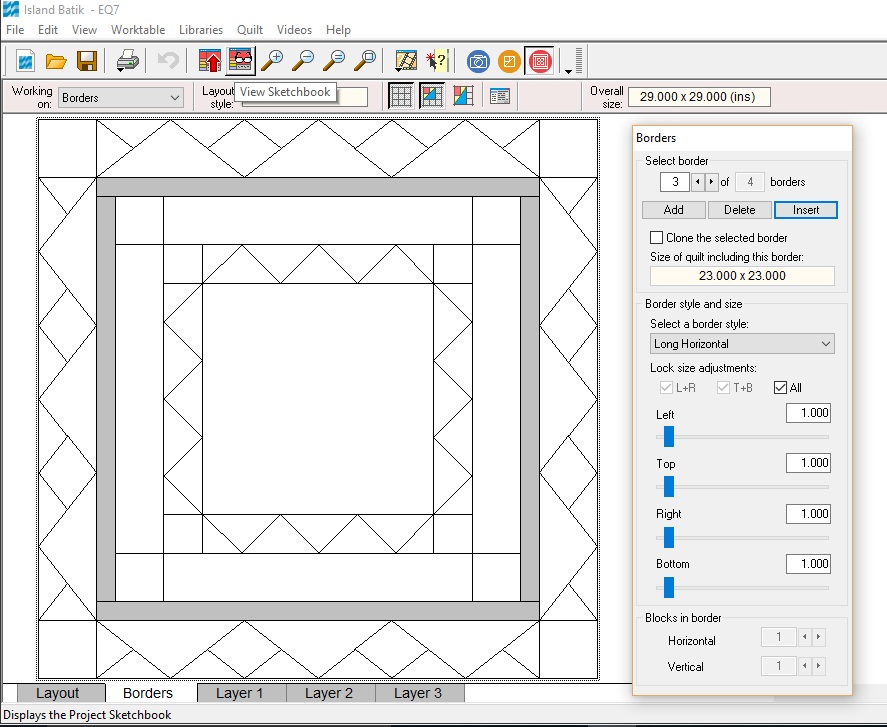
The next border I wanted to add would be a pieced border.  I chose Big and Little Points out for this one, but once it was colored decided that I wanted this border to be the final one and wanted to add an accent border inside of it.
So I went back to the borders tab, clicked insert and added my border:
I was happy with this layout, and after a bit of trial and error in adjusting to the sizes I was able to get that last border to have pieces that were square and easy to rotary cut and sew.  I'm not going to go through all of that right now, but I worked it out by selecting the border pieces after I colored them and using the print menu to see what the rotary cutting measurements were.  I found that by making the accent border 3/4 of an inch and the outer border 3.75 inches that the angles and measurements worked out perfectly.  If you can't adjust your measurements to work like this, you can also use the print menu to print out templates and cut your pieces that way as well.

And here is my finished design!  You'll have to wait to see the actual quilt until later this week, I have to finish sewing it.

I hope you've enjoyed this overview of how to add borders to make a medallion quilt on EQ7.  I love all the possibilities of working with the different border options.  You can also add blocks to the borders - which make the options infinite, as well as super challenging to sew!  Here is a fun design I came up using the same borders, but a different block in the center, and playing with setting blocks in the border patches:


I could go on playing with this for hours!

For more ideas about using EQ7 make sure you check out Quilt Shop Gal's Blog - she has been linking up several bloggers on the 10th of each month as we celebrate Electric Quilt's 25th anniversary - and make sure you use the #EQ25 on social media - I was a winner for their May social media giveaway!

Thursday, June 09, 2016

Using Custom Set on EQ7

I hope you are enjoying these monthly posts on EQ7 - I am really enjoying writing them and find that I am learning more new things and exploring the functions of the program more every month.  I also hope you are entering their monthly contests - they are giving away tons of great prizes, including a monthly prize for using #EQ25!  I was the winner for an Instagram post in May, so you could be a winner, too!

This month I was working on designing a row for an upcoming blog hop and since I wanted to use blocks in different sizes I needed to work with the custom set feature.  I haven't really worked much in this setting, so was pleased to find several features that make it easier than I thought it would be!

To show you some of the process, I loaded up my sketchbook with a variety of blocks, and got going.  Under the layout tab you can set the size of your quilt - mine is 48 x 48.  When you add your blocks, you need to press the shift key, right click and drag your block into position.  It's tricky to get your block the right size, but if you click on the Adjust tool on the right, then click on your block, you can type the size you want your block to be in the third set of boxes.  (The first set is your block location on the grid)  I made mine 18 x 18.

Then you can center your block on the grid by clicking the two icons on the far right - super simple!

Notice the first set of blocks, which show the blocks location on the grid - it measures where the block's top left corner is located, not the actual center of the block.  You can use those arrows to move your block up, down, right or left without having to drag it around.  It's more precise to do it this way, I think.

Now, do you want your block to be set diagonally?
You can do that using that single box beside the rotating arrow - a 45 degree rotation will put your block on point.  After you rotate it you will need to recenter it by clicking the appropriate buttons again.  

Now you can add more blocks.  I made these 9 inches square and rotated each one.  I discovered that instead of clicking and dragging, on the grid you can actually drag the blocks directly from the Sketchbook Blocks box!  I think that is a much easier way to do it, then I just resize the blocks as I go.  I set them around the edges of my center block.  Then I added more blocks.


After playing with the layout I though it would be fun to use just half the block.  You can't cut the block in half, but what you can do is to put the block to the back so you only see half of it - just click the button that says send to back and there is your half block!


Another neat thing you can do is trim a block that would extend beyond the border or center of your quilt.  You have the option for no trim, trim at border of quilt, or trim at center of quilt.  I trimmed at the center.  I also un-clicked the button to show the grid as it was a bit distracting.

You can continue to add blocks,as you like.  I found an easy way to change your blocks as well!  Just click on a block from the Sketchbook Blocks, then click on a block in your layout and it will replace the block!
All of these things I discovered just clicking around on my own and playing with the settings.  I'm sure there are a lot more neat tricks to discover - there is a built in lesson on Custom Sets that I plan on going through this month to find out more!  I know I will be using this option more often - it's a lot of fun and if you want to make a quilt with a variety of block sizes this is the way to go.

Electric Quilt is having a giveaway each month this year to celebrate - make sure you check their EQ25 Celebration to enter!  This month's sponsor is Aurifil thread, so they will be having a giveaway as well.

Darlene of QuiltShopGal has been sharing a list of bloggers who are writing about Electric Quilt each month so make sure you check that out as well to see what other bloggers are doing with EQ.  Thanks for following along!


Thursday, March 10, 2016

EQ25 - Using EQ7 to print templates for Applique

I guess it's a two post day today, I totally missed that it is the 10th of the month and I intended to share a post on EQ today!  It works out just fine, because I can share how I used EQ7 to print out the templates for this quilt:

When I decided to make the honeybee blocks for this quilt I went straight to EQ7 to print out my templates.  I must say I was sad to find that this is not a block included in the program.  There are a large number of traditional blocks that are included, but I wanted this particular block.  Thankfully, it is super easy to recreate in the program!

Since this block is combined with applique and piecing you want to make sure to design your block in the Easy Draw + Patchdraw mode!  Draw your patchwork grid - I used a 5 x 5 grid.


Next, switch over to applique mode using the tab at the bottom:

Select the teardrop shape using the drawing tool button for ovals.  If you want you can edit the curves a bit, then using the clone tool under the red arrow, make 11 identical copies:


Drag your teardrops to the desired spots and use the flip tools to turn them in the correct orientation.

 If you want to print the templates, go to File, Print, Templates

Once the dialog box comes up make sure that the size of the block is correct.  I have frequently printed the wrong size by mistake!  You can also choose if you want to print a key block, show seam allowance (and choose size of seam allowance) as well as number of copies.

 Once you have the settings correct, choose preview.  Using the delete setting, click and delete the pieces you do not want to include.
 When you are happy with your templates and their placement, you can print the page.  Don't close this tab or you will have to do the deleting over!  You can also move and turn the templates if you like.  These settings are not saved, so if you want to print multiples, make sure you do it now!
Here is the completed quilt on EQ7.  


I was sure glad to be able to print a page of those templates, it sure made it easier to trace them on fusible web so I could add them to the quilt.  If you desired you could even print them directly onto fusible web!  I'm a little scared of running it through my printer so I guess I'll stick with tracing them for now.

As you can see, EQ is useful for a lot of tasks in quilting - I'll be back next month with another project, I'm sure!

Make sure you take a look at Quilt Shop Gal's blog post for today - she features Wendy Sheppard - who has used EQ to design many quilts!  There are even free patterns you can download for some of the quilts.  I'll be joining in next week on a blog hop featuring Wendy's new book.  Make sure you join along, you could win a copy of it, and there will be Island Batik fabric as well!