Showing posts with label Island Batik. Show all posts

Sunday, January 23, 2022

Glorious Greens Step by Step Challenge - Island Batik Ambassador challenge for January 2022

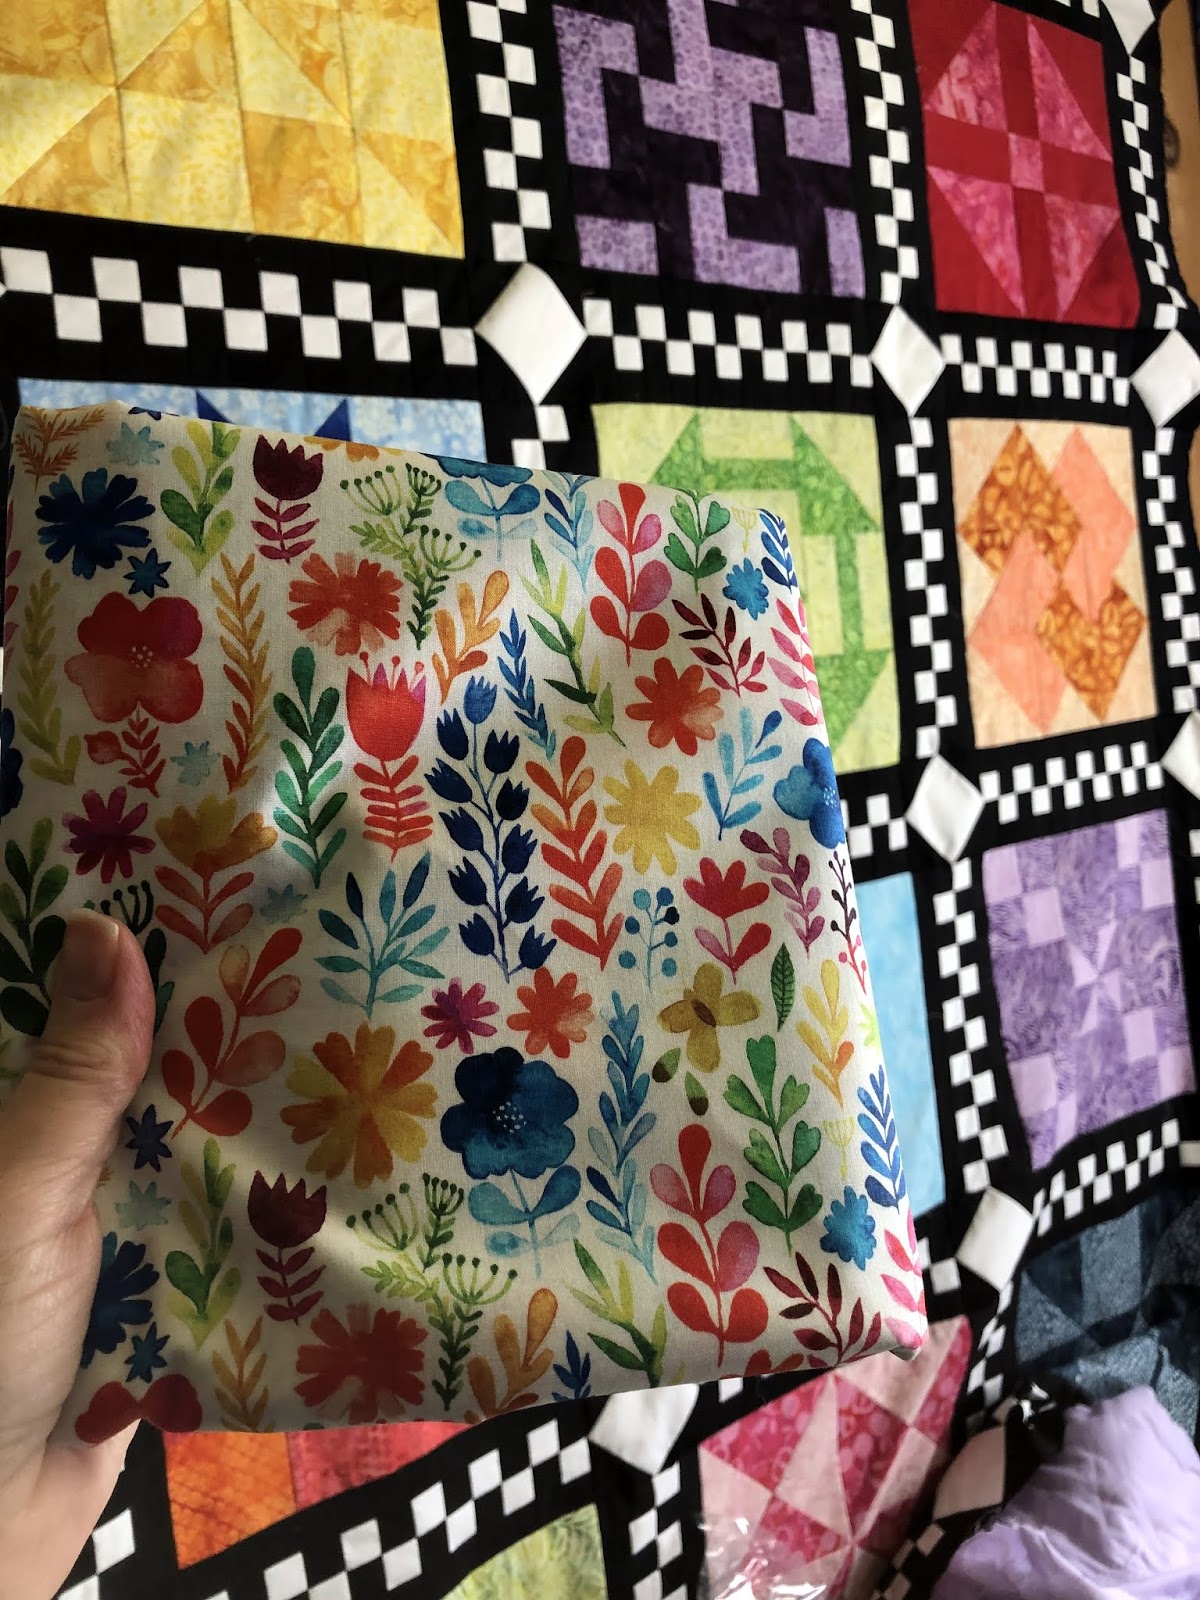
How is it that this is my first post of 2022?  I guess this year got off to a slow start, at least for blogging!  I've been busy as can be in my sewing room, though.  I've been playing with the beautiful new fabrics that arrived in my Island Batik Ambassador box for the first half of the year - yes, I have been selected to continue on in my role as an ambassador for them in 2022! 


I almost decided not to apply for this year, but at the last moment changed my mind, and I am so happy and excited to be a part of the team again!  The first challenge of the year was to use these Glorious Greens from their basics line to make a gradation quilt.  


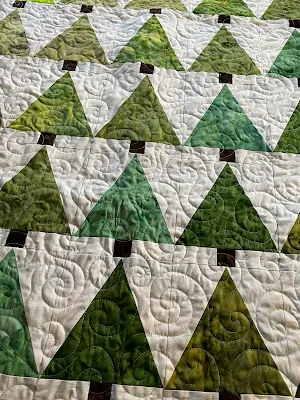
(Sorry, I must have been wearing pink when I took this picture as the lighter greens seem to have picked up a tinge of that!)  Aren't they pretty, though? Island Batik has developed ten colorways of gradations with 20 steps in each for their hand dyed basics line.  I was excited to get green because a quilt for my nephew was at the top of my list for the year and these were just perfect for that - he loves any color of green, so he gets a quilt with all of them!  I saw trees when I unwrapped these glorious greens, so decided to just make trees and graduate my colors from light at the top left to dark at the bottom right.  As always, I suggest to use the black and white filter on your camera to help decide value.


I did shift a few depending on the tone, but the black and white helps a lot!  I got out my Tri-Recs rulers and cut out a lot of pieces for the trees and background.  I used Rice for the background, the blue tone really looks nice with the greens, makes me think of a soft foggy day with the trees fading into the distance.


Time to get sewing!  That's a big stack of triangles, (110) but they went together pretty quickly, I just put a movie on my iPad and sewed my heart out.  It was really fun watching my forest grow on my design wall as I added each diagonal row of green!

I was just going to use the triangles to represent trees, but decided that they needed to have trunks.  Luckily I found the perfect brown in the basics and foundations bundle I was sent, so cut some strips and made trunks in a jiffy.  The pattern is Weave and the color Brownie!  Of course I like it - haha!


I sewed the columns as I went to help keep me from mixing up the values - I only had to rip out a couple of times!  I thought about staggering the rows, but decided that I liked them in nice straight lines!  When I got the top finished, my husband suggested blue for the back since they live in a town by the ocean, so I took the two 2 yard pieces that were sent with my precut strips and sewed them together to make a back.


I used the bleached cotton batting from Hobbs that was included in my box for the batting.  I love the weight of this batting, it's has a nice soft feel and drape, and will make this quilt nice for snuggling in!  I happened to have a spool of green variegated thread by Aurifil in 40 weight that was perfect for using on this project!  I decided that a swirl would be the perfect quiting design to finish this off, so put a Schmetz size 14 needle in my machine and got to work.


I found a nice dark green on my Island Batik shelf from another year (Poplar Trees in Hunter Green from Citrus Sun) for the binding - and love the way this finished!  My finished quilt measures 66 x 70 - hopefully big enough for my 6 foot nephew to snuggle under. I can't wait to get it in the mail to him,  I know he will love it!


You wouldn't think that the green thread would go with those dark greens, but it really looks wonderful on the quilt!  Sometimes you just have to go with your instincts and try something different - I figured there were enough different greens on this quilt that the thread would blend in, and it did!  And note that the 40 weight thread is wound on a green spool - more happy green for my project.


And my husband's idea of using blue on the back was right on.  I love the water inspiration, and am so happy with the additional personal touch for this quilt.


I usually piece my backing vertically, but I realized that I needed the extra length since each piece was 2 yards long - and it worked perfectly!  These pieces are from the Brilliant Blues - the dark is Denim and the light is Powder Blue. 

Thanks to Island Batik, Hobbs Batting, Aurifil Thread, and Schmetz Needles for making this project possible!


Saturday, August 01, 2020

August Island Batik Ambassador Challenge - Try A Tool

Can you believe that I have already finished my August Island Batik Ambassador challenge?  I can't!  This month for our challenge we were provided with a ruler by Deb's Tucker Studio 180 Designs - I chose the Corner Beam ruler, and I have to say that I definitley haveto give it a 10, two thumbs up, and five stars!  But let me tell you more about the challenge.


The rules for this challenge were very simple - just to make a project of any size using at least 16 units and use the ruler to make it!  I was super excited to see that my ruler made units as small as 1 inch finished - yes, that means I get to make a fun mini quilt!  Woohoo!

Since the units are small, the William's Garden precut strips were a perfect choice for my project.  This is from the Spring 2020 Island Batik line - the precuts are available in shops now, but the yardage won't be arriving in shops until September/October.  I really like getting my hands on the precuts early, it's like getting a preview of what's coming up!  This was designed by Kathy Engle for Deb Tucker's Studio 180 Design Studio.

I started out by unwrapping the ruler and checking out the directions. Then I went to the Studio 180 designs website and watched the video - it looked very simple and easy to make the corner beam units, so I cut a 2 1/2 inch square from each of the 20 strips and got to work!
  
Arent' they beautiful?  Each of the units measures 1 1/2 inches finished.  Look at those precise tips!  And they were so easy to cut, piece and trim.  
Before I knew it, I had all 20 little corner beam units sewn up.  I divided them into 5 stars.  Each unit is so precise that they sew together very nicely!  I was impressed at how well everything matched up.  And I love the pretty blues, greens and purples in this line!  

I decided to put them together into an point layout.  (The background is Egg White)  I added a skinny border (1/4 inch) of the light green (Marble - Frog), and 1 inch of the darker green (Grass).  They really do make a wonderful frame for this quilt!

I love how that light green just sparkles!  Now it was time to quilt it.  I used a size 10 Professional Chrome needle from Schmetz, and 80 wt thread from Aurifil that had been provided in an earlier Island Batik Ambassador box.  It's really great for quilting miniatures.  I used some of the Heirloom silk batting from Hobbs because it's so nice and light - perfect for mini quilts!


I chose to just add some straight echoing lines to give this some nice texture.  I used green thread in the stars and border, and off white in the background.  I think it came out really well!  I am getting a lot more confident in my ruler work!  On a little quilt like this, it's nice and easy to maneuver, too!


This mini quilt measures 11 inches square and I'm delighted with it.  I still have a lot of that strip pack left...I'm pretty sure that there will be more playing with the Corner Beam ruler and William's Garden this month.  I definitely want to explore more designs with this unit - there are so many possibilities!

Keep an eye out for more mini quilt fun on my facebook page.  And you'll want to watch the rest of the Ambassadors blogs this month for more great projects using Deb Tucker's Studio 180 Designs rulers!  


Thanks to all of the wonderful companies for giving me these items to make this project with!


Thursday, July 30, 2020

Christmas In July with AccuQuilt and Island Batik

This month we had a really fun assignment as Island Batik Ambassadors!  AccuQuilt sent each of us a GO! Me Fabric Cutter Starter Kit and asked us to make a quilt using only the two dies included in the kit (3 inch finished quarter square and half square triangles) and present the cutter and small quilt as a gift to someone that we thought would really enjoy using it!

The items in this post were provided for me to use through the Island Batik Ambassador program.

If you haven't seen the Go! Me cutting system yet, here are some of the really great things about it:

  • Ultraportable - allows quilters to take the GO! Me with them anywhere

  • New quilter gains confidence in their art form faster

  • Elevates workmanship of the quilter

  • Same cutting performance as the GO! - Fast, Accurate, Easy and Safe

  • Includes two GO! Dies, cutting mat and pattern book

  • A great gift for any quilter


Not to mention, that it is so totally stinking cute!  Plus there are tons of dies that you can use with this, from piecing to applique.  You can visit the AccuQuilt site to see more of what they have.  Plus the Go! Me is on sale right now...I don't know for how long, but it's a good price for the starter kit!

On to the challenge!

I was having a hard time deciding on who I would gift this to, so I decided to get started with the quilt while I was thinking.  There are a few nice patterns in the book that's included with the GO! Me starter kit, and there was a baby quilt that used this pinwheel block, so I decided to make a few of them and see where that led me.  I was so delighted to discover that the Island Batik Stashbuilder rolls are the perfect size for these dies!
I cut quarter square triangles from these and used Sprinkles from the foundations for the background.  I decided to offset the colums because I liked the movement this added to the design.  I added a half pinwheel to square my little quilt off and it was finished in no time.  I just love using the Accuquilt for triangles because there are no dog ears to have to trim off!  It really makes the sewing go quickly.

And in hardly any time I had this cute 24 x 27 inch quilt.  I had two of the gold strips from my rolls, so I used those for the binding.   I quilted it in a spiral pattern using Aurifil thread in a pale gray 50 wt.  Goes with everything!  The batting is a piece of the Hobbs Heirloom cotton with scrim - which has a lovely softness and drape for small quilts.  Of course I used a Schmetz needle for the piecing and quilting!  I like the size 10 chrome Professional for piecing and the size 12 for quilting.

By the time I finished the quilt I decided that I would like to surprise my friend Lora with this fun Christmas in July surprise!  I have known Lora for quite a while now, she took some of my classes several years ago when she was a very beginner and is now also working at Threads That Bind!  I arranged to meet her yesterday afternoon, and presented her with the quilt and the cutter.  She was so surprised!


Lora and I both want to say a big Thank You to AccuQuilt for their generosity in sponsoring this challenge!  As well as to Island Batik!  I also gave Lora the leftover fabric and a few Stashbuilder rolls to play with.  It was fun to think of getting another quilter addicted to the fun and ease of using the Go! cutter - I know she is going to love it as much as I do.  

Make sure you visit the rest of the Island Batik Ambassadors and see their Christmas in July posts!  We have all had such fun being able to gift these wonderful little Go! Me cutting systems, and it was really a great moment for me to get to share this with my friend, Lora.  It was a very fun Christmas in July, indeed!

Thursday, January 30, 2020

Color Challenge 2020

I couldn't resist joining in on Jen's Color Challenge 2020, especially since I am so in love with my finished top for 2019 - it is absolutely one of my favorite quilts I have ever made!  It is so gorgeous, and I have just been admiring it on my design wall since I finished it.  (Ignore the pile at the bottom!)


  I even found the best backing fabric for it - isn't this soo perfect?


For this year's color challenge the theme is birds.  Maybe I need to keep my eye out for a beautiful bird print to back this one?

January's bird is the American Gold Finch.  Here is Jen's blop post with the link to the pattern. Very cute little bird, and a lovely shade of yellow!  I decided to go with a black background for my blocks this year and am going to use Island Batik fabrics for this one as well since I just had more black added to my stash of goodies.  I have plenty of scraps to choose from for each month's color as well, so I know it'll make a great quilt.

January's block was a piece of cake - strip piecing, my favorite!  I did have one row that needed to be un-stitched and resewn because the corners didn't meet very well, but that was just me being in a rush to get it done. 

You still have today to get your block pattern for free and enter the link up to be eligible for a quarterly prize drawing!  Thanks Jen, for another great year of fun blocks!

Sunday, July 07, 2019

Enjoying a couple days of nothing but sewing!

After a couple of very busy weeks, I've been enjoying some time just sewing at whatever I feel like working on.  It was really fun, and I'm looking forward to more of the same this afternoon.  I made good progress on a secret project for August - you are going to love it! Here's what I've got so far (sorry for the black and white, but I want to wait until the reveal to show you the lovely Island Batik fabrics)

 I almost finished up the pieced borders for the Brothers and Sisters quilt, sewed two sides on, and got them quilted.  I am closing in on being able to cross this one off my list!  I need to make some corner blocks and figure out how to work that corner part, then add the end pieced border.  I think there just might have to be a partial strip because of the size of the small border there.  Then three solid borders and I'm done!

I also started sewing a new shop sample.  This is my Tidepools pattern.  The fabrics are Marabella by Free Spirit fabrics.  This literally came home with me right off the cutting table as soon as it came into the shop - so pretty!  I've got one more set of flying geese and the square in a square units to compete before I start making blocks.
I've decided that I want to make this my OMG (one monthly goal) for July.  Pieced, quilted and bound!

I also need to update three patterns with new covers and write one pattern.  That should keep me busy for the month!

Well, I suppose I should go get some sewing done before the day gets away from me.

Linking up with Becca at Pretty Piney for What I Made Monday
Beth at Love Laugh Quilt for Monday Making

Monday, July 01, 2019

Quilts of Valor Blog Hop

Welcome to my post for the Quilts of Valor Blog Hop!  I was very excited to join in on this hop, one of my goals for this year was to make more quilts to give, and this was a terrific opportunity.  Island Batik sponsored this hop, providing us a wonderful bundle of their Freedom line to work with, and Jennifer of Dizzy Quilter is our awsome host!

I have never had the opportunity to make a quilt for Quilts of Valor, so the first thing I did was check out their website to see what the guidelines were and how to participate.  Turns out that it's pretty darn easy!  There are some size suggestions, and they ask that the quilts be pre-washed.  You can choose to give a quilt to someone that you know, or if you like they can find a recipient for you!  When you donate you are asked to register your gift so that it can be counted - so far the total of quilts given is over 200,000!  Isn't that awesome?

There are even patterns you can download to use.  I saw the Carpenter Star and decided to make that, thinking it would be fun to use with the Stack of Freedom Fabric I was sent.
There was the perfect amount of red and blue for the star, and I supplemented the white with the solid white yardage included.  While I was cutting 6 7/8 inch squares from each piece, I had a brainstorm that I could make a piano key border using the leftover strips of fabric instead of solid borders.  I love a scrappy looking quilt, so I was really happy with this plan!

Aren't these fabrics gorgeous?  Love the patriotic look of them!  I had a few issues with my math for the borders, but in the end they came out perfectly!
So pretty!  One tip for making this quilt is that you don't have to sew the whole thing together in rows.  I made four separate quarters - they are identical so it makes it easy to rearrange if you don't like the way the colors align.

I had planned to use white in the border as well before I realized that there was white all around the stars - which would make white bars in the border look kind of weird.  I needed to cut some extra pieces from the yardage to make enough strips for the borders, but that left me with enough of the yardage sent to piece the back as well - but I didn't get a picture of that yet.

I quilted the white with a medium meander, and am filling in the blue and red with simple lines.  I'm not quite finished yet, but will do the borders with loops and stars then bind it in the darkest blue.

I haven't found a recipient yet, and there is no local Quilts of Valor group.  I am hoping to make a connection through a local project for veterans, and will definitely follow up and let you know who I end up awarding this quilt to.  Thanks again Jennifer for the opportunity to make this quilt and show appreciation to someone who has served our country, and to Island Batik for providing the beautiful fabrics!

If you are interested in making a quilt yourself, make sure to visit Dizzy Quilter and enter her giveaway!  There is also a block drive, if you don't want to make a whole quilt, make a block (or 2 or 10!)  See the Quilt of Valor website for all the information you need to participate!


And make sure you check out these blogs for more Quilts of Valor, featuring Island Batiks:

July 1
Becca Fenstermaker — Pretty PineyDenise Looney — For the Love of Geese
Gail Sheppard — Quilting Gail
July 2
Pamela Boatright — Pamela Quilts
Anne Wiens — Sweetgrass Designs
July 3
Bea Lee —Bea Quilter
Carla Henton — Creatin’ In the SticksJuly 4
Emily Leachman — The Darling Dogwood
Joan Kawano — MooseStash Quilting
Jen Strauser – Dizzy Quilter
July 5
Steph Jacobson — Steph Jacobsen DesignsLeah Malasky — Quilted DelightsAnja Clyke — Anja Quilts
Maryellen McAuliffe — Mary Mack Made Mine

Thursday, June 27, 2019

Try It! Challenge for Island Batik - Nanette's Fractured Bargello Jacket

I was really excited about the June Challenge that was extended to the Island Batik Ambassadors - to try a new technique.  At first, it was really hard to think of a technique that I haven't tried, but then ideas started coming and I had enough ideas for several challenges!  A quilted garment was one thing that interested me, or maybe a bargello quilt?  In the end, I decide that it would be fun to make a quilted jacket using Nanette's Fractured Bargello Jacket Pattern and do both.  Here are the results:
Colorful and fun!
I really like it - it was fun to choose the colors and arrange them in a pretty order.  The pattern was very helpful and the instructions were easy to follow.  And bonus - I have almost a whole strip set left over and plan to make a matching bag out of that!
I do have to admit that I cheated a little on this challenge, the fabrics I used are all Island Batik, but because I needed 1/3 a yard each of 12 different colors I ended up chosing them from our stock at the quilt shop.  Several are from the Eclectic Garden collection, and some are Paisley Dot.  I love mixing and matching colors and patterns, and it's a fun challenge to take fabrics from different lines and use them together.  It was super fun to combine different lines from Island Batik and just play with making a fun color strata.  The Blueberry Paisley dot I used for the fracture strips was one I had used in a quilt last year - it's definitely my all time favorite color!  

It was serendipity that I needed three 2 1/2 inch strips of each fabric - the 2 1/2 inch strip die for the Go cutter cuts three strips at once!  Since you can cut 6 layers of fabric I was able to cut all my strips with four passes through the cutter - super quick and easy!
After that quick job, it was simple to sew all the strips together to make three rainbow sections for the bargello.  After that it was not quite that simple - not because of the pattern, but because of me not paying good attention to the directions!
I did my fair share of ripping out during the making of my jacket - notice that end strip?  I inadvertently separated my strip at the wrong point, then sewed it on upside down.  I also did the second sleeve with strips that were all cut 1/4 inch too wide.  After three days of debating myself about whether or not it would be noticeable I ended up ripping that sleeve out and doing it over - and am glad I did.

I do wish I had gone up one more size on the sweatshirt that I used for the base of the jacket.  I didn't want it to be too baggy, but I think it could be a bit larger.  I guess that gives me the opportunity to make another one, right?  And I can't wait to work on the bag I want to make from the leftovers of my project!

For this project I used assorted Island Batik fabrics, the 2 1/2 strip die and Go! cutter from Accuquilt, plus blue and pink 50 wt thread from Aurifil.  No batting required because this project uses a sweatshirt for the base.  Thanks for the wonderful products and the fun challenge!  Go visit the Island Batik Store Locater and see if you can find a local store to make a rainbow out of their Island Batik fabrics!
Linking up with:
Myra Finished or not Friday
Finished or Not Friday at Busy Hands Quilts
The Inquiring Quilter (Wednesday Wait Loss)