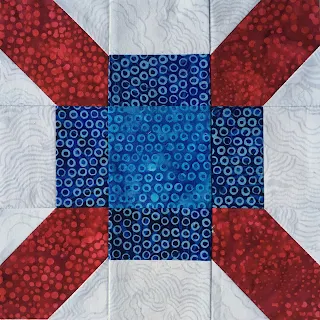
I was looking through some quilting magazines this weekend and found some terrific scrappy quilt patterns. One of them actually used a combination of lozenge units and four patch units so I thought it would be fun to use that combination for this weeks block:
To make this block you will need to cut four 3 1/2 squares of your featured fabric, eight 2 inch squares of your background fabric, and one 2 x 22 inch strips of two different fabrics.
Sew four lozenge units from the featured fabric and the background fabric and lay out like this:
Make five Four Patch units by sewing the two 2 x 22 inch strips together. Press and cut this pieced strip in half. Place right sides together with the opposite colors facing each other, then cut into five 2 inch strips. I like to use my June Tailor strip cutter for this step, it's super fast and easy!
I experimented with laying out the Four Patch units, because I was not sure which way would look better. First I tried with the green squares lined up with the lozenges:
Then I tried turning them so the red squares were lined up with the lozenges. I liked it this way best.
Sew the squares together and you are finished! That's it for July - next week I'll round up our progress so far - 28 blocks - plus will have a fun surprise for you. Then the first Monday of August we'll learn a new unit - can't wait! You'll also want to check out my posts later this week as I am working on my Island Batik challenge for the month - Oh Baby! You'll notice some familiar units in this project :)
Showing posts with label Lozenge. Show all posts
Monday, July 24, 2017
Monday, July 17, 2017
Alternate Block for Lozenge Unit, Quilter's Recipe Box
After a week of cleaning up my sewing room it was a real pleasure to spend time this weekend sewing! I love how much nicer it looks, and even though there is still a lot of stuff in there, I know what all of it is and what needs to be done.
This week's block uses the Lozenge unit in the corners again, and this time I set them so they would make a frame for the center of the block:
I decided to call this block Merry Go Round. It doesn't take long at all to sew this one up, and I think you could do lots of interesting things with the center of the block. I decided to use a 9-patch, but wouldn't it be cute to do different mini blocks?
To make this block you will need to cut four 3 1/2 squares and four 2 x 3 1/2 rectangles of your feature fabric. Cut eight 2 inch squares and four 2 x 3 1/2 rectangles of your background. For the nine patch center you will need four 1 1/2 inch squares of one fabric, and five 1 1/2 squares of another fabric.
Sew the four lozenge blocks and arrange in the corners so they form a frame:
Next, sew the four split square blocks and place them on the sides, with the feature fabric toward the outside of the block:
Sew it all together and you have your finished block:
It's a good thing today's block was a quick one, because I have a BIG project to work on today! A cushion for a window seat - I'll have to get back into upholstery mode for this one. Lots of piping to go around the edges and a long zipper to make it easy to remove for cleaning. I love a little variety in my projects, and just one cushion isn't too bad, even though it is a large one! I'll try to remember to take a picture of the AFTER for you you - though it won't be fancy, it will look a lot nicer than the foam and batting before :)
Have a terrific day!
This week's block uses the Lozenge unit in the corners again, and this time I set them so they would make a frame for the center of the block:
I decided to call this block Merry Go Round. It doesn't take long at all to sew this one up, and I think you could do lots of interesting things with the center of the block. I decided to use a 9-patch, but wouldn't it be cute to do different mini blocks?
To make this block you will need to cut four 3 1/2 squares and four 2 x 3 1/2 rectangles of your feature fabric. Cut eight 2 inch squares and four 2 x 3 1/2 rectangles of your background. For the nine patch center you will need four 1 1/2 inch squares of one fabric, and five 1 1/2 squares of another fabric.
Sew the four lozenge blocks and arrange in the corners so they form a frame:
Sew your nine patch block for the center:
It's a good thing today's block was a quick one, because I have a BIG project to work on today! A cushion for a window seat - I'll have to get back into upholstery mode for this one. Lots of piping to go around the edges and a long zipper to make it easy to remove for cleaning. I love a little variety in my projects, and just one cushion isn't too bad, even though it is a large one! I'll try to remember to take a picture of the AFTER for you you - though it won't be fancy, it will look a lot nicer than the foam and batting before :)
Have a terrific day!
Monday, July 10, 2017
Whirligig - Alternate block for Lozenge Unit, Quilter's Recipe Box
Welcome to month number seven of the Quilter's Recipe Box. If you are new to the series, check out the Quilter's Recipe Box tab at the top of my blog for an overview and a look at all the blocks I've made so far. For this project I've been using Dotalicious from Island Batik. Such a fun line!
I was having a bit of a mental block for working on this week's block - I think my sewing room has reached a tipping point - I've got to do something about the mess and disorder in there or I'll just start pitching stuff in the closet so I don't have to look at it anymore. I did do some rearranging and tried to get rid of some of the clutter. You know how it goes, though - I mostly just shuffled piles from one spot to another! I did get it clean enough to feel like working on this block finally, though.
I liked the idea of using the Lozenge unit to make a star in the center of the block, but really fussed around about what to do with the corners. I tried the white on the outside, but that was pretty blah. Finally I tried it with the green on the outside and that made it come to life for me!
Quite a few pieces for this block, but it goes together quickly! Cut four 3 1/2 inch squares of your darkest fabric. Cut twelve 2 inch squares of a light color. You need two 3 7/8 squares of your background fabric, cut in half diagonally for the half square triangle units. Cut two 3 7/8 inch squares of a contrasting fabric for the corners (cut in half diagonally) and one 3 1/2 inch square of the same for your center block.
Sew a light 2 inch square to opposite corners of your dark 3 1/2 squares. Arrange them so that the light corners look like star points.
Sew your four half square triangle units for the corners.
Then sew the Square in a Square unit for the center and you have all your units completed for the block:
Sew the units together and you have your finished block!
I really like the spinning motion of this block - I think it could make a fun quilt on its own.
My plan for this week is to work on two custom quilts using baby clothes and try to make a bit more progress in organizing my sewing room! I also have several blog posts planned, so I can show some projects I've finished up this last week. Maybe I'll even show you my progress in cleaning up...we'll see, it's a bit embarrassing at the moment!
Monday, July 03, 2017
Quilter's Recipe Box - Unit Seven, Lozenge
Welcome to month number seven of the Quilter's Recipe Box.
This month's unit is a variation of last month's Square in a Square Unit - but instead of adding to all four corners we will only be adding to two corners. The block is Linoleum. It is featured in the Farmer's Wife book, as well as EQ7. I haven't found any more information about it, but it's a nice block!
So, let's get started and make the block! You will need one 3 1/2 square of your feature fabric, four 3 1/2 squares of a secondary fabric, and four 2 x 3 1/2 rectangles of a third fabric. From your background fabric you will need eight 2 inch squares and four 2 x 3 1/2 inch rectangles.
First, you will sew the four Lozenge units. Mark each 2 inch square on the diagonal. Sew one square to two of the corners of the 3 1/2 inch secondary squares as below:
Trim, and press to the outside of the block.
Make four Split Square units from the 2 x 3 1/2 inch rectangles. Then lay out your block like this:
Then sew it together and it will look like this:
Easy as can be :) You can get the entire set of Quilters Recipe Box units in my Etsy shop!
Last week I mentioned a giveaway. I have an extra spool of Aurifil thread to pass on to a lucky person. I accidentally bought a duplicate spool of red that I thought I would pass on.
This gorgeous red is called Paprika. It is a beautiful bright red and would look awesome on a patriotic quilt!
Labels:
Aurifil Thread,
Giveaway,
Linoleum,
Lozenge,
Quilter's Recipe Box
Subscribe to:
Posts (Atom)