
Are you ready to see my finished quilt for this month's Island Batik Ambassador Challenge?

Our goal this month was to celebrate aret and use the Aurifil thread we were provided as paint on the canvas of the Island Batik fabric. I'm excited to share my vision and the results with you! But first, I'll show you what I used to create my challenge quilt:

The stars of this quilt are the six beautiful colors of Aurifil Thread I received that match the glorious colors of Peacock Galore. They are all 50 wt spools and the colors are: Eggplant (4225), Butter (2120), Medium Delft Blue (2783), Bright Orange (1133), Light Jade (1148),and Spring Green (1231) What a beautiful palette of colors to work with!

Well, what else can you do with a fabric line called Peacock Galore except make a quilt inspired by a peacock?
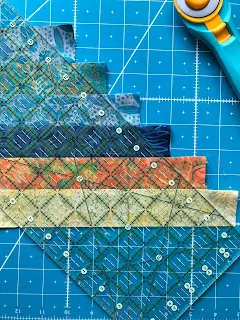
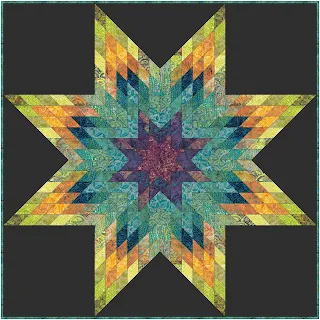 I decided to make a blazing star using all 20 prints in the Peacock Galore Line! I had a great time in EQ8 playing with color placement. I finally settled on this version, placing the purple in the center and working out to the lime greens. To come up with a 36 inch quilt, I needed to cut 1 3/4 inch strips. So I proceeded to cut strips and start sewing strip sets.
 So much pleasure in seeing the colors blend and contrast with each other! Finally 8 wedges were put together!


 Before starting with my stitching I made sure to give my machine a cleaning and put in a brand new Schmetz needle! The last one in this packet - I really like these Chrome needles, they seem to stay nice and sharp all through your project. Schmetz provided these for us to use earlier in the year.

I started out by thread painting the eyes in the peacock feathers, beginning with the dark blue center, then adding the various colors. I love the way the 50 wt Aurifil thread shows up against the black solid Island Batik fabric! I used a chalk pencil to trace a circle for the center. I outlined it and worked my way stitching up and down into the center of the circle. Then I added the lighter blue, stitching back and forth a few stitches at a time to add a ring around the center, Next was the purple, then the orange. I went back and forth around the top of the circle, then up and down to elongate that ring at the bottom. I found that it looked best when I just stitched up and down and didn't outline the shape. Instead of using my hands to move the fabric up and down, I found that using my abs to rock my body and move the fabric helped me have more control! It was a good workout, too!

 I took a little liberty and made my plumules wavy instead of straight like an actual feather would be. I used the Light Jade, Spring Green and Medium Delft Blue to try to capture that irridescent look of the color of the peacock feather. I think it works!
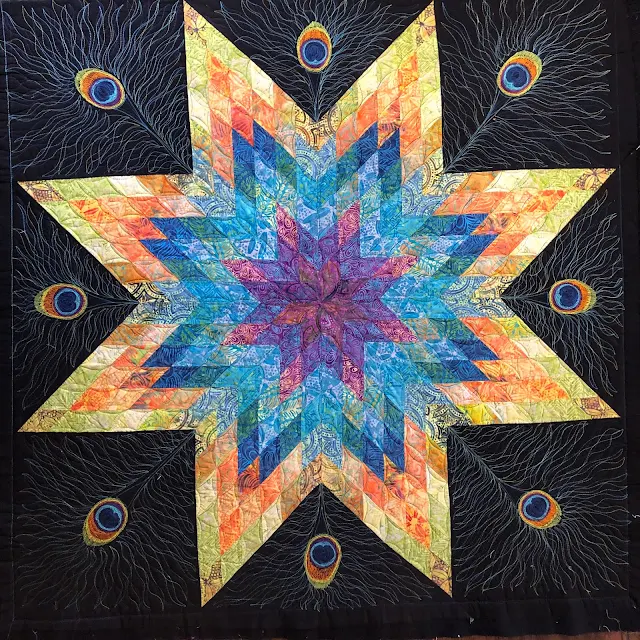
 I used the darkest blue fabric from Peacock Galore along with solid turquoise for the small piping. Here is my quilt all clipped up for hand stitching the back of the binding!


Can't you just see all of the colors of thread that I have in this feather?


And now it was time to sew the wedges together to make the star!

So pretty! The next step was to decide for sure on the background. I wasn't 100% positive that I wanted to use black, but once I tried stitching with the threads on it, I knew it was going to be just what I wanted for my thread painting. I must confess that I was very nervous about this part of my project. I honestly wasn't sure if I had the skill and patience to pull off the picture in my head.

I got my top basted, using the wonderful black batting provided in my July Ambassador box by Hobbs. (80/20 black batting is great for projects with dark colors!) Then I quilted the star, doing a curvy echo around all the diamonds, and matching each fabric with the Aurifil thread color closest to it.


I started out by thread painting the eyes in the peacock feathers, beginning with the dark blue center, then adding the various colors. I love the way the 50 wt Aurifil thread shows up against the black solid Island Batik fabric! I used a chalk pencil to trace a circle for the center. I outlined it and worked my way stitching up and down into the center of the circle. Then I added the lighter blue, stitching back and forth a few stitches at a time to add a ring around the center, Next was the purple, then the orange. I went back and forth around the top of the circle, then up and down to elongate that ring at the bottom. I found that it looked best when I just stitched up and down and didn't outline the shape. Instead of using my hands to move the fabric up and down, I found that using my abs to rock my body and move the fabric helped me have more control! It was a good workout, too!

The next step was adding yellow, then I added a final ring of green! And wouldn't you know it, on the final green ring, my machine decided to go a little wacky. (Yep, I used this gorgeous purple on the back! I think this one is Cherio in Iris from the Blenders collecion!)

I'm going to write another in depth post on how I resolved this issue, but yes- it was very frustrating!


I was really happy with how my quilt looked when I was finished quiting! It really did come out just like I pictured, so I'm happy that I took a risk and tried something different. I do wish I would have used my chalk pencil to mark out where I wanted to quilt the feathers because some of them ended up getting under the binding area, though. For the binding I decided to go all out and use the Piping Hot Binding technique using the trim tool designed by Susan K Cleveland. I'm glad she has a YouTube video of how to do the binding because it's been a while!


Once the binding was sewn, we went outdoors for a little photo shoot! My quilt measures 36 x 36. I love the way the thread painting I did adds to the effect of the piecing. It's always fun to try a new technique, and I'll definitely want to do some more playing with these vibrant colors on more projects.

What did I learn from this challenge? Don't worry about making something perfect - just have fun trying!
Thanks to Island Batik, Aurifil Thread, Schmetz Needles, and Hobbs Batting for the products used in this project!
10 comments:
What a thrill to have created your dream vision exactly how you envisioned it. Your peacock feathers are glorious.hope you are walking with some swagger 'cuz you just knocked this one outta the park!
Gorgeous detail! What a fun technique to challenge yourself and have such awesome results. It's perfect on this quilt!
Brilliant. Looks like an award-winning quilt to me. Beautiful fabrics, colors, design, and spectacular thread painting.
Very creative. I wouldn't have had any idea where to start with a challenge like that!
WOW!! When I seen your completed quilt, it took my breath away!! Truly spectacular =D
Wonderful design and execution, plus great fabric choices. I love everything about this quilt.
It is a beautiful work... Your talent is showing.
I am in love with this! The peacock feathers are just gorgeous!
This turned out fabulous! I love lonestars and your peacock quilting in the black is fantastic! Such a great way to interpret the challenge. Just Beautiful!
Pamela, this is breathtaking!!!!!! I love the star, I love the feathers you've stitched...it just all goes together so well. Amazing!!!
Post a Comment