How was May for you? Truthfully it was a roller coaster of emotion for me, and I struggled a bit. Things opening, but everything cancelled. So much uncertainty. Still making masks. Starting back to work at the Quilt shop. It's surreal and strange, yet time keeps passing and I NEED to be sewing something fun!
This month, you'll be doing lots of sewing - at the end of this month you will have 8 more blocks for your quilt and will be past the half way point for the quilt! It's not difficult sewing, but lots of repetition. I give you two different options for making this block. You can make this block using a stitch and flip technique, or make it in the traditional method of cutting squares and triangles to fit.
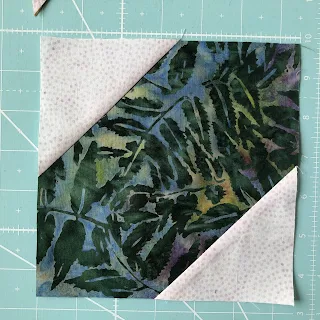
I couldn't find any pictures of my construction of this block and had to do some retracing of my steps to figure out why. I was working with 1/2 yard cuts of fabric, and you can't cut the number of 6 1/2 inch squares needed from that amount of fabric, so I ended up making my square in a square units the traditional way - thus I didn't have any pictures of how to construct them using the stitch and flip technique. So I got out my fabric and took some pictures just so you all can see how it's done!
So for each square in a square you will need one 6 1/2 inch square of your contrast fabric and four 3 1/2 inch squares of your background.
Draw a diagonal line on the reverse side of all of your background squares.
Stitch the background squares to the corners of the contrast square - do two diagonal ones first.
Trim 1/4 inch from the seamline.
Press the seams out.
Sew two background squares to the two remaining corners.
Trim corners off 1/4 inch from the seam line
Press the seams out and you are done! (If you like you can save those cut off corners and use them for some thing later - they make pretty pinwheels!)
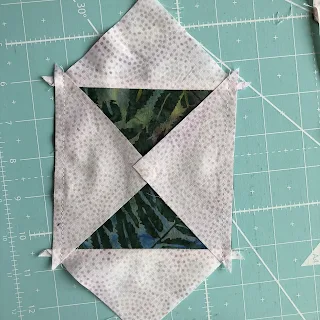
To make these units the traditional way, you will cut the center squares at 4 3/4 inches and cut squares at 3 7/8, then cut in half diagonally for triangles.
Finger press a crease at the center of the square.
Do the same for the side triangles.
Match up the creases to center the triangle on the edge of the square
Sew a 1/4 inch seam.
Repeat on the opposite side.
Press triangles out and repeat on the remaining sides
Measure and trim off the dog ears.
You will sew two square in a square units to two 6 1/2 squares of your light fabric to complete 12 of these blocks. (I used 1 square each of 2 similar fabrics for the blocks in my quilt because I was working with 1/2 yard cuts) I think this will keep you busy for the month of June! Next month we'll be doing the Dresden plate squares - so we'll be doing some different techniques. It will be fun!
I'd love to see your color choices and progress, so feel free to share - use the hashtag #steppingstonesquiltalong and #pamelaquilts on instagram so we can find them easily. I'm resisting the temptation to start a new version, but will be sharing pictures of the four I've made so far as we go!
Thanks for quilting along with me!
Buy my pattern here: Stepping Stones Sampler
Find the list of blog posts here: Stepping Stones Quilt Along


No comments:
Post a Comment