Are you ready for some mitered corners? Otherwise known as Y-seams. This technique might be intimidating to you, but this little block is perfect for learning them and practicing your technique. That's how I got to be a pro at doing them - I made a quilt that had 160 of them - after doing it that many times, I can do them in my sleep now!
The key to a perfect y-seam is to NOT stitch beyond that 1/4 inch seam allowance. Just remember that and you will be fine.
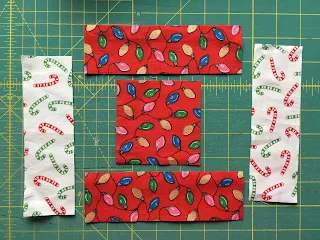
This block has four spool units. Here are the pieces for my first one.
You may have a ruler with a hole in it so you can mark those 1/4 seam allowance intersections at the corners, but if not you can easily do this with a regular ruler marked at 1/4 inch intervals. Just line up your ruler so you have 1/4 inch sticking out and put a dot on each side, a quarter inch from the edges. Repeat on the other edge, and you are ready to sew. Sew from one dot to the next, backstitching to secure the ends of the seam.
Find the center of your spool, and the center of one of the background strips and match them up. You can pin or put a clip to hold them together, then sew your seam. (Make sure your edges line up, I have the bottom one pushed out a bit so you can see how I've lined up the centers in the photo above)
Your finished seam should look like this. Now we are ready for the second seam!
Find the center of the next side of the spool and the center of the spool end. Match them up and sew the second seam, making sure you do not sew over the first seam, just right up to it.
Ready for that nice mitered (y-seam) corner? Fold your block in half diagonally so that the sides of your block are nice and lined up, push the seams toward the center (press them if you like) and the center will be folded diagonally. Once you have it lined up nicely, use your ruler and place it so that you can draw a straight line from the point where your seams end to the corner of the edge fabric. You can put a pin to hold everything in place. Sew on this line, making sure not to stitch past the previously stitched seams.
Open your corner out, and this is how it should look! If you have a pleat in your corner, you probably stitched over another seam, or your fabric wasn't smoothed flat. If you have a hole, you didn't stitch close enough to the the corner. It's a short seam, so go ahead and pick it out and try again if you aren't happy with it! That's the beauty of this block, the seams are short enough that it's not a huge pain to get out the seam ripper.
Continue adding the rest of the pieces in the same manner. Press all seams toward the darker fabric (most likely the spool). Each unit should measure 6 1/2 inches, make four and sew them together to complete your spool block!
I hope you enjoy making this, and don't say too many bad words! Make sure you go pick up the pattern on Etsy -
Complete Pattern
I even included directions for making it without those Y-seams, but I hope you try the technique anyway. Once you get the hang of it you can do so many fun things, like fancy borders, Attic Windows, and even sew hexies by machine! Definitely a great tool to have in your tool box!If you make a block, share it on facebook and tag me - @pamelaquilts - I would love to see your version. Have a wonderful weekend, and go play with fabric!


2 comments:
I am missing a few blocks' patterns. Is it possible to get the patterns for the blocks I can't find? Thank you.
Ooooh Pam! This is so pretty. Thank you so much.
Post a Comment