
Welcome to my day for the Island Batik All Puffed Up Blog Hop! I had so much fun making my quilt from the River Walk Collection designed by Jean Wells - fabric and notions provided by Island Batik and their industry partners for the Island Batik Ambassador program. The challenge was to make a puff/bubble quilt using as many of the fabrics in the provided collection - always a fun thing for me since I love making quilts with a variety of fabric!

I had never made a puff quilt before; in fact, I was kind of intimidated by the process. It was serendipitous that right after the challenge was announced that I happened to stumble upon a post from an Instagram friend that she was participating in the Ombre Puff Quilt Challenge and it looked like she was having a great time making her quilt! So I downloaded the pattern, watched the video and was ready to go - well, almost ready. I needed to obtain some fiber fill, first. I ordered a 40 oz bag of Ultra Plush Polyfil, and when I picked it up I was surprised at how large it was - the size of a king size pillow full of stuffing! Now, I was ready to get started!

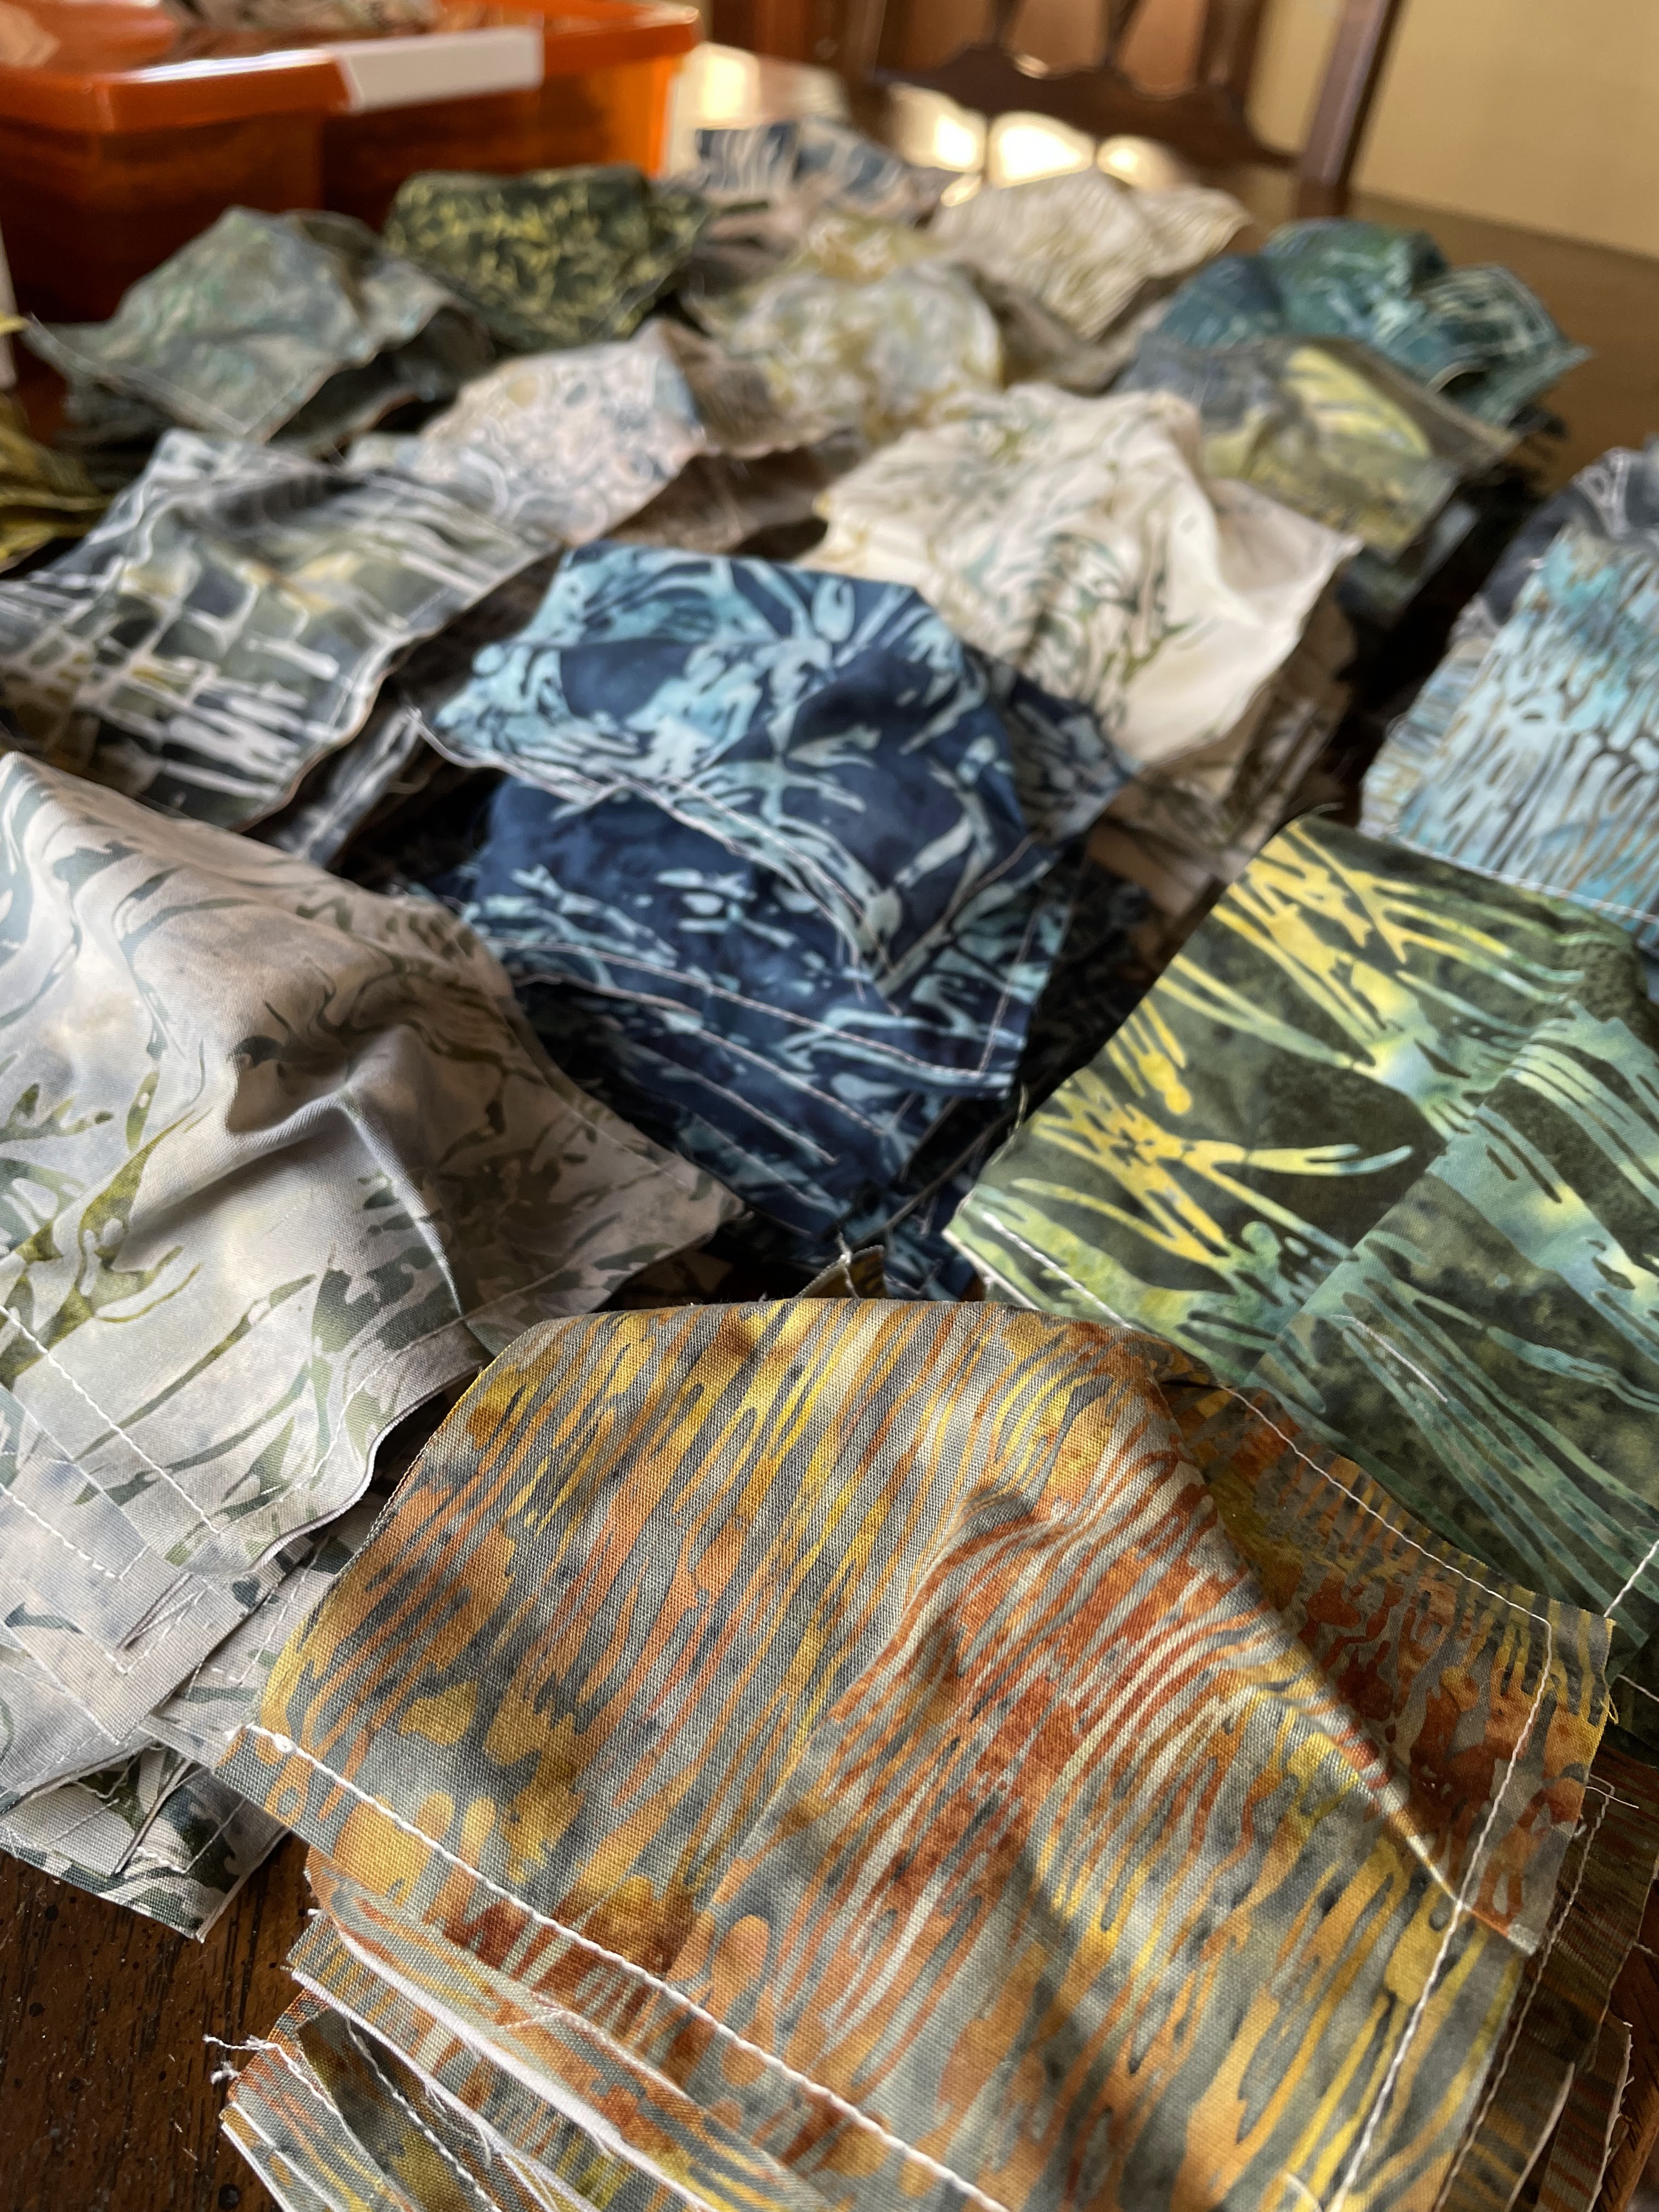
Take a good look at this beautiful bundle! It's always so much fun to unwrap the fabrics and fondle them before cutting them up! I decided to make a quilt that was a smallish lap size. I figured out the squares needed, which ended up being 9 of each fabric. I cut out my squares for the front of the quilt, then for the back of the puffs I needed the same number of squares, only a half inch smaller. Since these are hidden between the top and back of the quilt I decided to go through my Island Batik scraps from the previous years and chose some leftover hunks and pieces that I knew I wasn't going to be using, plus some 5-inch strips from stashbuilder rolls that weren't my preferred colors. So, I cleaned out a little of my fabric shelves and made progress on my challenge, too!

As you can see, these fabrics are really lovely! If you like to create nature inspired quilts, or landscapes, these are terrific! Jean Wells is a designer and owns the Stitchin' Post in Sisters, Oregon, so I was excited to get to use this collection, since I am also in Oregon. You can also find these beautiful fabrics at Mulqueen Sewing & Fabric Centers (AZ) and Creekside Quilts (OR)
The first step of sewing is to sew the puff top to the backing around three sides, adding a tuck to take up that extra fabric. I used a variety of Aurifil threads on this project - I had a cone of 40 weight in an off white that I used for the top thread, and since it is a scrappy quilt, I finished up a whole bunch of random bobbins. I usually like to match my thread to my project, so it was nice to be able to free up some bobbins! I used an 80/12 Schmetz Microtex needle - and it breezed through all the layers with no problems, I love how sharp the Microtex needles are! I used a scant quarter inch seam for this part, you leave the fourth side open for stuffing later. After I sewed all my puffs, I stacked them up by color, then started laying them out to see how I wanted to arrange them.

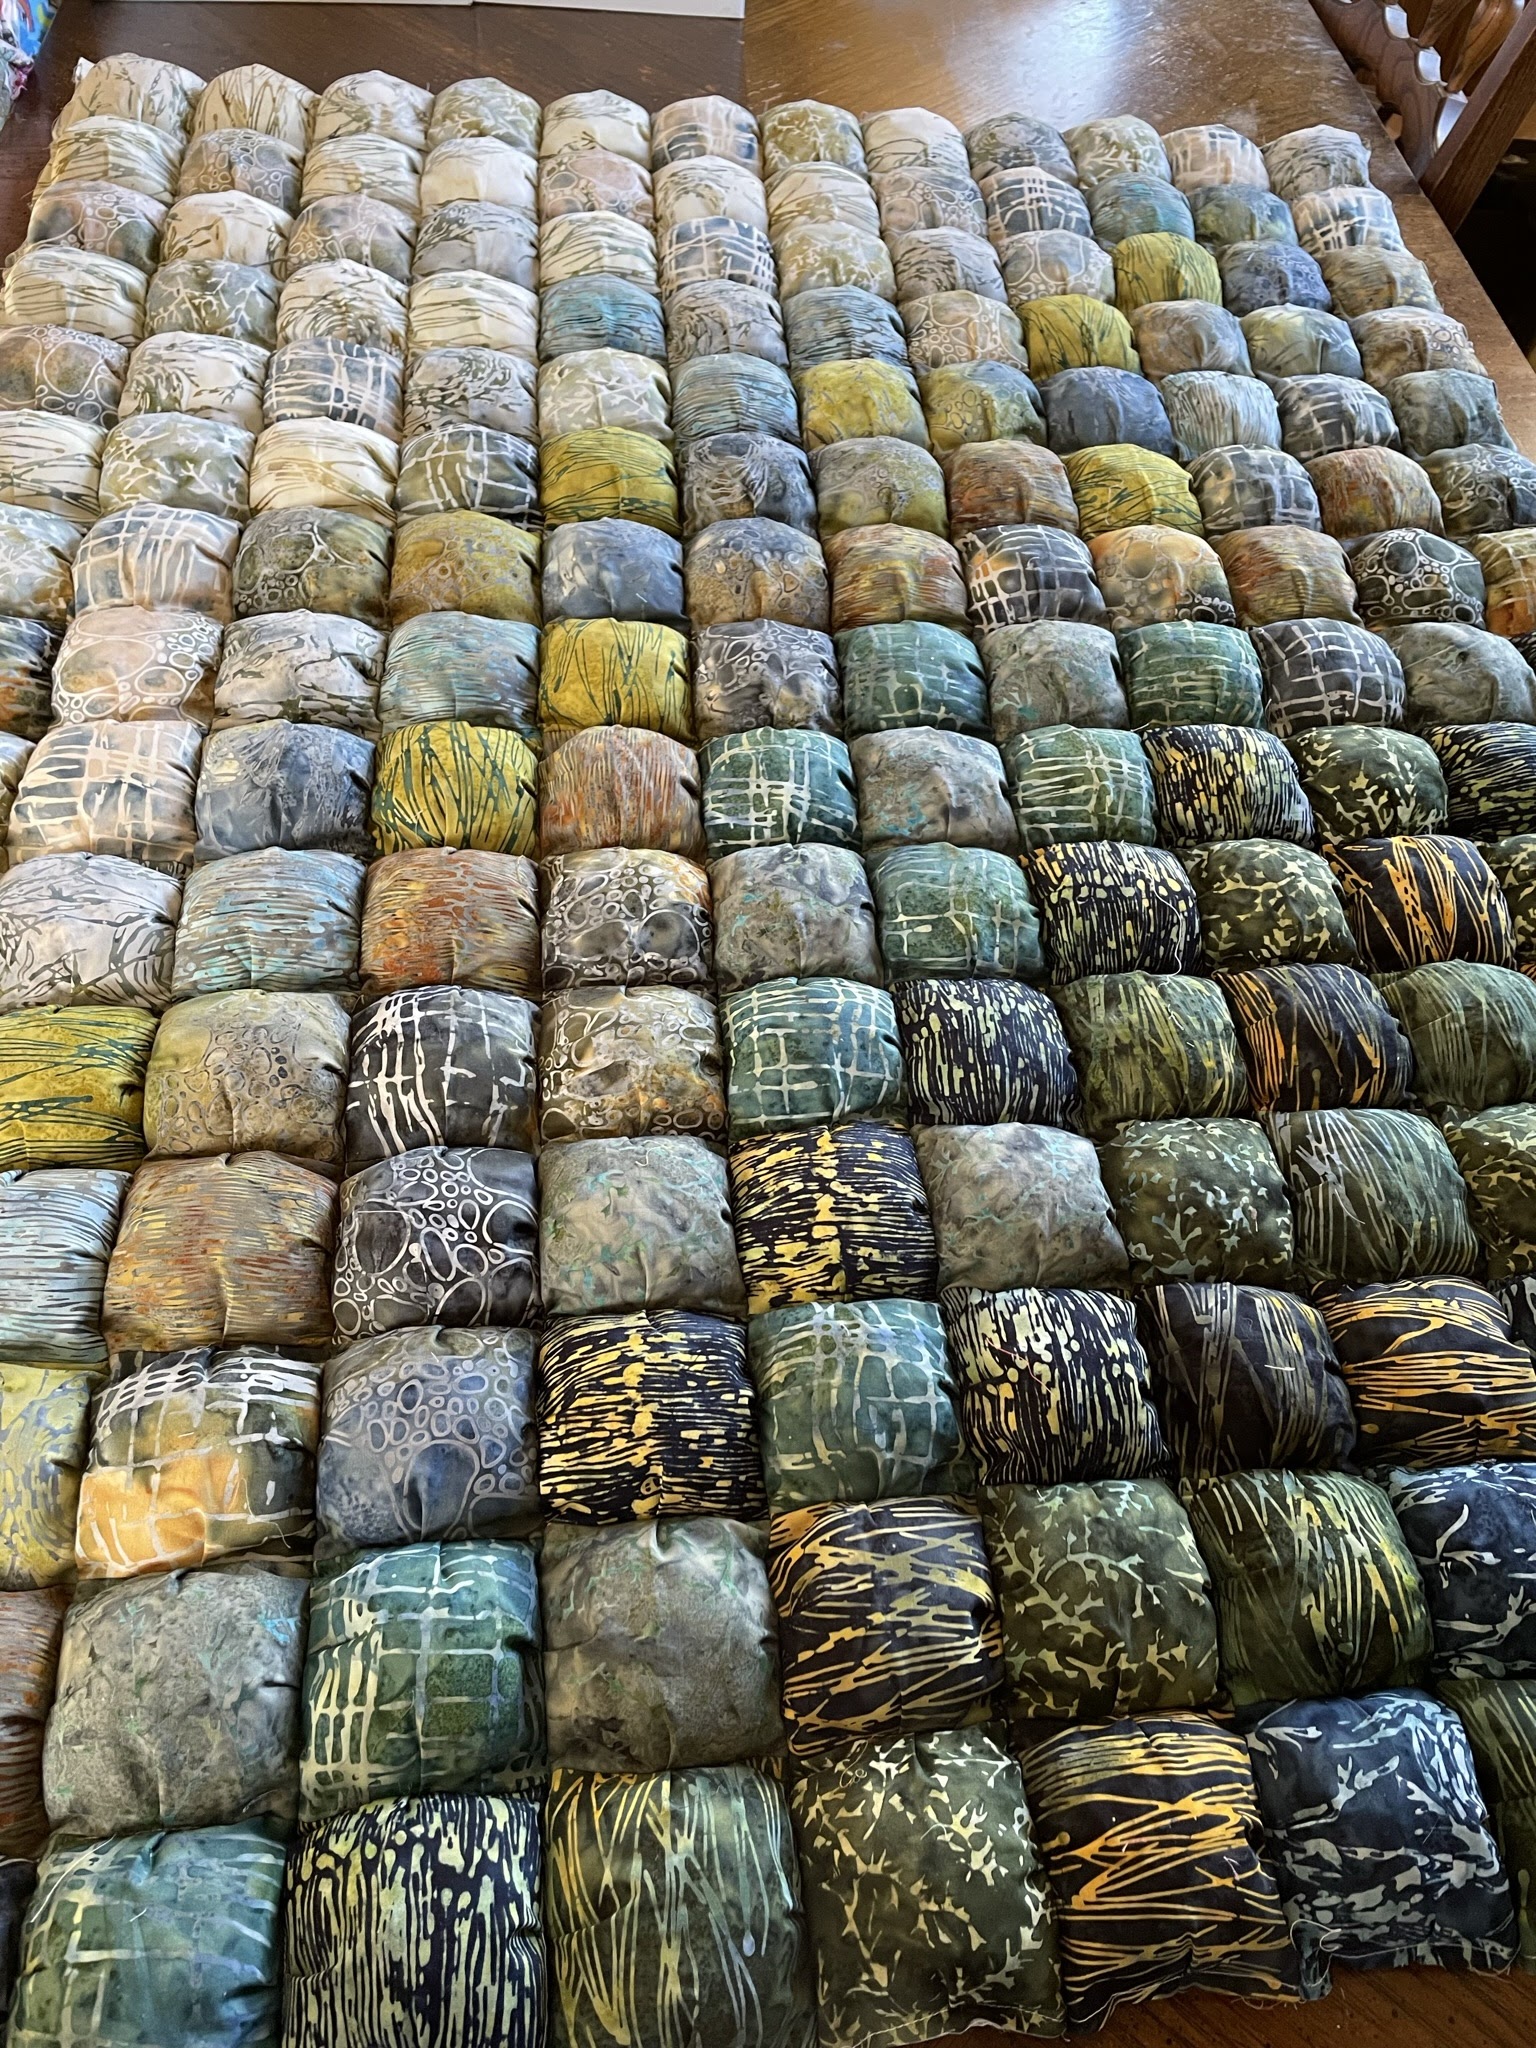
It seems that not all of my sewing happens during daylight hours, especially in January so the lighting isn't the best for this picture, but you can see the color gradation. This is the layout I came up with, I liked the diagonal ombre effect, I think it really suits the fabrics. The next step is to keep your fabric organized because you sew this version together in columns. I very carefully gathered up my future puffs for sewing, keeping them labeled and clipped together in the proper order.

As I sewed the columns together, I placed them on my design wall so I could make sure I wasn't getting things mixed up! The openings in the puff all face to the right so you can stuff them easily as you are stitching up the seam.

You start by sewing the first row, one puff at a time, sewing each puff shut as you go, then you stitch the next row to the puffed row and keep repeating! It's really easy, and fun! It is a little tricky to judge the amount of stuffing to put in each puff, you don't want them too puffy. After a while you get the hang of it and it goes quickly. If you are doing a large quilt, you'd want your sewing machine on a large table, but my sewing desk worked just fine for this size!

I just loved seeing the texture happening! It makes you want to pat them and squish them! I found the combination of batik fabric with the stuffing to be very pleasing.

Love these fabrics - they really do remind me of rocks in a river, and I love the earthy colors! Soon I had the entire quilt puffed up and ready to finish! I chose the method in the Ombre Quilt Tutorial for finishing my quilt and added batting, then a backing fabric to the bottom. To keep it extra fluffy I used Hobbs Poly Down Batting for the batting! It's nice and soft, not too fluffy, and lightweight!

I was also provided with 2 yards of this beautiful fabric from the River Walk Line - aren't the birds nests sweet? This happened to be my favorite fabric in the collection, so it was perfect to use for the backing! The backing is topped with the batting, then the puffed up quilt top. I pinned it between every two puffs to hold it together for the final step.
Of course, I couldn't resist another picture! I can see why they call it a biscuit quilt, they look like a pan full of fluffy rolls!

I found the perfect shade of aqua embroidery floss in my stash, and proceeded to tie the layers together. I used a nice sharp crewel needle. Just a tip - if you have a hard time pulling your needle through the fabric, you need a larger needle! I had a little trouble getting through the many layers, but it wasn't too bad at all. I liked the x between the puffs and the little ties on the reverse!

To finish the edges, I trimmed the backing and batting one inch from the edge of the puffs (after stitching one fourth of an inch all around the quilt. I left the extra batting and folded it into the edge for a fuller look for the edging. Mitering the corners was the hardest part, but they came out all right. I think this finish looked nice - it was a little tough to get it straight because the puffs cause the edge to wave a bit, but I decided early on that this wasn't a project where precision and perfection was a high priority!
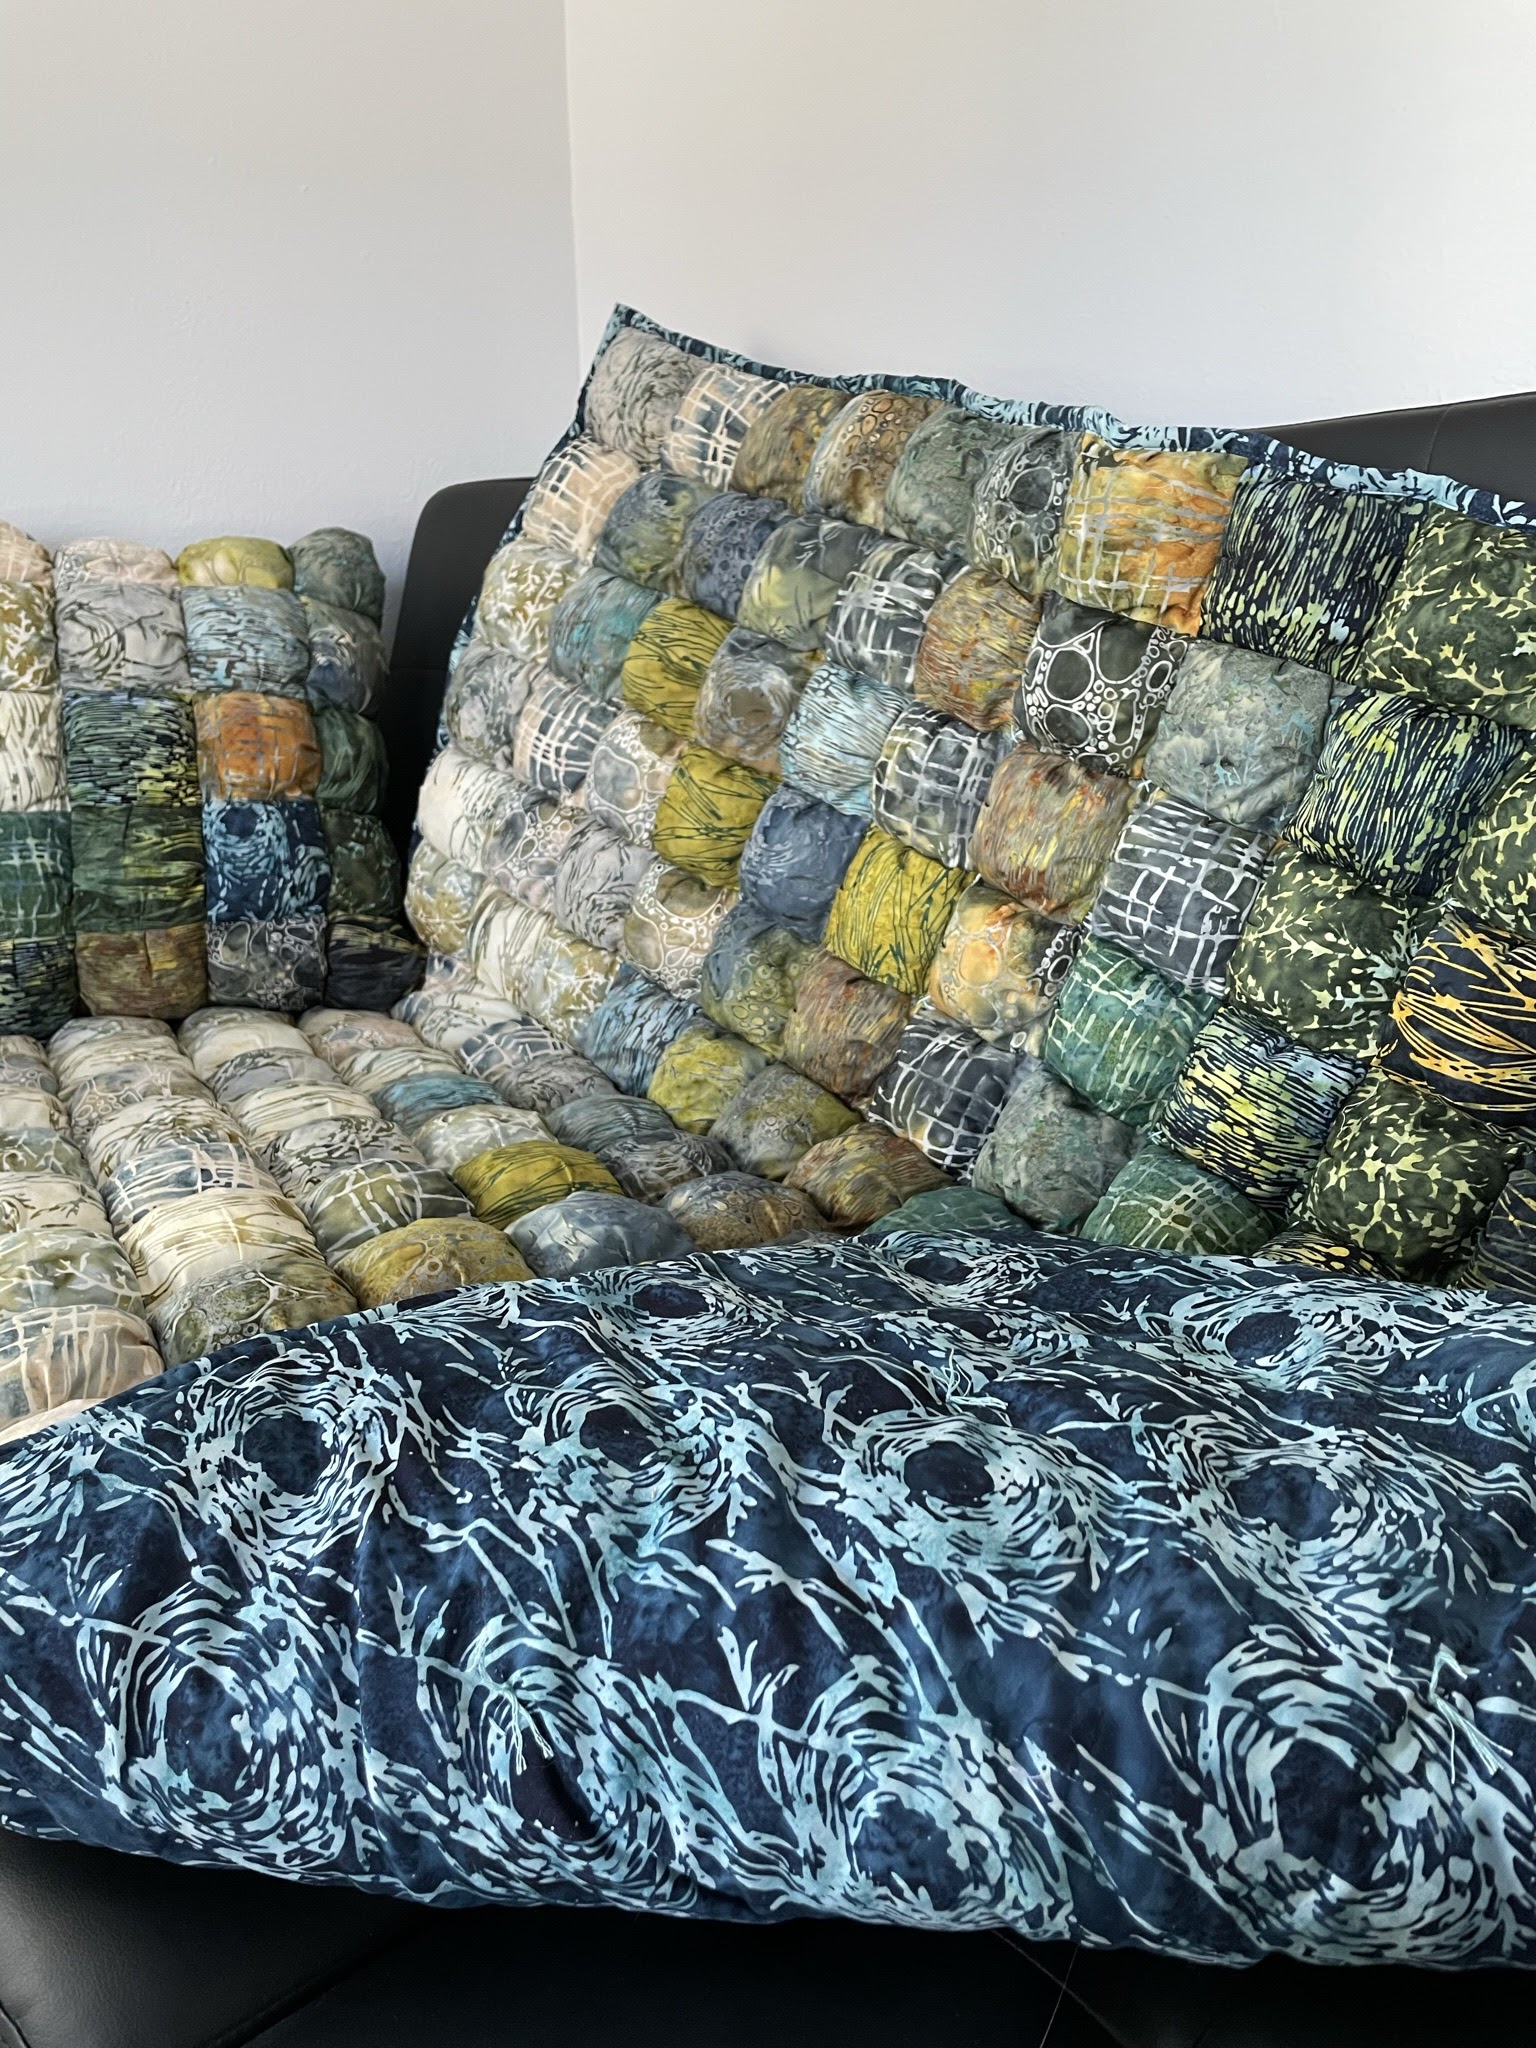
I had so much fun with this project that I made a pillow to match! So cute! And isn't this backing sweet? I am so delighted with it!

Such a photogenic quilt! I loved working with this fabric collection, it really is just beautiful! I think you will like it, too. In fact, I am going to give you a chance to win my leftover fabrics - I've made it a goal to either use or pass on my extra fabrics this year since I am starting to run out of space in my sewing room! No Scraps Left Behind is my motto this year!

I've got a nice pile of bits and pieces of varying sizes - I know someone will love playing with these! I'll also throw in a Schmetz needle guide booklet and a luggage tag, too.
Have a great week and enjoy the rest of the All Puffed Up Blog Hop! Check out Lana's post at Lana Quilts to see her puff quilt with this collection! Oh, guess who discovered my puff quilt yesterday? We couldn't find Scamper all afternoon, so I went upstairs, and there he was enjoying an awesome nap on my new quilt! So cute!


27 comments:
I have one puff quilt that my grandmother made and I like it ok but have never really been interested in making one until NOW! I think your fabric choice and layout was perfect. It really gave the look of stones in a river. I think you have me hooked to try one. I will have to go look at the others you mentioned. Thanks for sharing the details too. I think that is the bet process I have seen so far.
I never made a puff quilt, I might in the future. Yours looks nice to snuggle with on the sofa. Your cat is happy with it. 24Tangent@gmail.com
Pamela, your quilt is absolutely beautiful! I love the way you put it together. You made it look so easy. I saw the Biscuit quilt a long time ago in a book I have and wanted to make one. But things happened and I never got around to making one. It is still on my list and I hope to get one made very soon.
Thank you for your giveaway.
I have never made a puff quilt. I have seen one and always thought it would be fun but had never actually looked into the process. I think this blog hop has helped me see how much work it is just because there is a learning curve from traditional quilting. I think I would still like to try one, but probably in the future when I have a little more time to dedicate to trying something new. Thanks for sharing your detailed process and pictures, your quilt is beautiful!
Your puff quilt is great, Pamela. I think the kitty has claimed it as it's own! LOL
I made a doll bed size puff quilt for my niece about 40 years ago. She still has it.
I like the look of puff quilts. I have never actually tried one so I don't know if I would like to use one. I have often thought of trying to make one but haven't so far.
My mother has made puff cushions for my rocker..But it's the ok only ones I've seen...Great jon love the picters.
oh but your quilt and pillow is gorgeous. thanks for sharing and inspiring. no I have not yet made a puff quilt but the more I see of the quilts in this hop the more I feel I must make one.
I would love to make a puff quilt! Your quilt is lovely.
Beautiful puff quilt!!! And a coordinating pillow!
Thanks for sharing all the steps in making it!
Fantastic puff quilt!!
Love it, i never make but one day....
I've never made a puff quilt. Yours turned out beautifully! You might have to fight Scamper to get it back!
You nailed the visual of a river walk with your quilt and I love that your cat loves it. You gave an inspiring tutorial. Beautiful job.
How beautiful! I really never wanted to make a puff quilt, but looking at yours I think I have changed my mind - and the fabrics are so lovely!! Great great and pillow and kitty!
I made a puff quilt a few years ago - scrappy pastel colors from my stash. I stuffed each square separately (a good hand project while watching TV), but then it was more work to sew them together. I like your technique better!
Before the blog hop I had absolutely no interest in making a puff quilt, to be honest. Now that I've seen how the dogs and cats are crazy about them, I might make a small one and see if I like the process, knowing that my "test quilt" will be put to good use.
I love the ombre effect you chose. So pretty and somehow absolutely appropriate for this collection, I think.
Your quilt is wonderful. I love how you laid it out. I made one puff quilt in my 65 years of quilting. It hasn't gotten any easier. Not sure I'll make another. I'll just admire everyone else's.
I am not sure I would tackle this, but I like your methods of putting the puff quilt together--your's really turned out well!!
I love puff quilts and would love to make one. I'm just not sure if I would have the time or patience to make one. But they look so comfy.
Fantastic!!
I don't know. i might try it out the next time i need a gift. (i don't really care for it, but i like to try new things when i need a gift)
What a pretty finish.
Making a puff quilt has always intrigued me and know that I know how to go about it, I would love to use some Island Batik scraps to make a few pet beds for our house. Seeing some pets enjoying the puff projects makes me realize how much my senior dogs would love one too. Once I get more accomplished with them, I'm going to make a biiiiggg one!
Your quilt is lovely… the batik colours are beautiful too! This blog hop is inspiring me to try making a small puff quilt… something for my dogs!! Thanks for all your tips they are very helpful.
I love this puff quilt & the colors you used! I’m finishing up a batik nine-patch quilt top for my bed. I love working with batiks—they are easy to work with.
I've never made a puff quilt, but seeing how much your cat is enjoying your quilt makes me want to make one for my kitties. Your quilt is just gorgeous! Thanks for sharing your process and for for the beautiful photos! And thanks for sharing your leftovers. Good luck with your sewing room space!
Post a Comment