Sorry for missing getting this out on Wednesday, but it has been a horribly busy week. Next time I do a series I will have them all written out beforehand so I can just post them as needed. My sincere apologies, now on with the sewing!
Today we will be setting our blocks together. This goes pretty easily with these small blocks because you can lay them out on your counter or cutting table and you don't have to have a big floor space. It gets a little trickier if you have to lay out a quilt with big blocks, so this is really good practice!
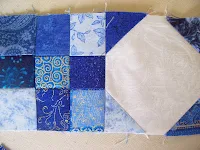
For this quilt we are making 7 rows of 7 blocks. Start with a nine-patch, then alternate with a snowball and lay the first block out in a row.
Starting from right to left, sew together - with blocks this small I don't spend a lot of time fussing about matching the seams, though I do like to sew with the snowball on top so I can see where the point is and don't blunt it. Sew with a 1/4" seam, making sure that your nine patch is fully flat so you don't have any little pleats where the seam lies. Open up your blocks and press toward the 9-patch block. Check to see if your points line up with your seams on the 9-patch, which they should. If they are obviousy off, pick out your seam and try again.


Now, you can sew the second row in the same manner. This row starts and ends with a snowball block.

Aren't they pretty? Now you are ready to sew two rows together. Flip the second row over onto the first row, right sides together.
The trick to sewing these together is to match up the seam allowances between blocks. Since all the seams are pressed toward the 9-patch blocks, you will have a great reference point to match these seams. Line up the two seams and pinch them between your fingers. Now slide yolur fingers slightly side to side until you feel those seam allowances nestle into each other. If you feel a big ridge, they are overlapping so you will want to slide them apart. If you feel a valley, then they are too far apart and you want to slide them closer together. I do this for each seam as I approach it while sewing, but if you want to do them all at once and pin them you can do that also. I recommend placing one pin on each side of the seam instead of trying to pin it in the middle. When you pin in the middle you often end up pushing your seam allowances out a smidge with the pin itself. This is what those intersections should look like after they are sewn together. If you have one or two that are off, simply unstitchf about halway down the block on each side and try again. Press seam allowance to one side (doesn't really matter which way) when you are satisfied with the way your rows look.
Make a third row, sew it onto the first two, then continue on until you have all 7 rows sewn together:
Lovely!
Now, this Wednesday, we will add the borders to your little quilt. This lesson is one that is valuable for quilts of any size, but like this one is a little easier because you are working with smaller pieces, so it's less bulky and hard to handle. If you have trouble with your borders being wavy or too small, I think my pointers will help you with this. Till then, happy sewing!


No comments:
Post a Comment